Flutter Navigator 2 navigation and routing system (I)
Information drawn from
This article explains how Flutter’s new Navigator and Router API works. If you follow Flutter’s open design docs, you might have seen these new features referred to as the Router widget. We’ll explore how these APIs enable more fine-tuned control over the screens in your app and how you can use it to parse routes.
These new APIs are not breaking changes, they simply add a new declarative API. Before Navigator 2.0, it was difficult to push or pop multiple pages, or remove a page underneath the current one. However, if you are happy with how the Navigator works today, you can keep using it in the same (imperative) way.
The Router provides the ability to handle routes from the underlying platform and display the appropriate pages. In this article, the Router is configured to parse the browser URL to display the appropriate page.
This article helps you choose which Navigator pattern works best for your app, and explains how to use Navigator 2.0 to parse browser URLs and take full control over the stack of pages that are active. The exercise in this article shows how to build an app that handles incoming routes from the platform and manages the pages of your app. The following GIF shows the example app in action:
Navigator 1.0
If you’re using Flutter, you’re probably using the Navigator and are familiar with the following concepts:
- Navigator — a widget that manages a stack of Route objects.
- Route — an object managed by a Navigator that represents a screen, typically implemented by classes like MaterialPageRoute.
Before Navigator 2.0, Routes were pushed and popped onto the Navigator’s stack with either named routes or anonymous routes. The next sections are a brief recap of these two approaches.
Anonymous routes
Most mobile apps display screens on top of each other, like a stack. In Flutter, this is easy to achieve by using the Navigator.
MaterialApp and CupertinoApp already use a Navigator under the hood. You can access the navigator using Navigator.of() or display a new screen using Navigator.push(), and return to the previous screen with Navigator.pop():
import 'package:flutter/material.dart';

void main() {
  runApp(Nav2App());
}

class Nav2App extends StatelessWidget {
  @override
  Widget build(BuildContext context) {
    return MaterialApp(
      home: HomeScreen(),
    );
  }
}

class HomeScreen extends StatelessWidget {
  @override
  Widget build(BuildContext context) {
    return Scaffold(
      appBar: AppBar(),
      body: Center(
        child: FlatButton(
          child: Text('View Details'),
          onPressed: () {
            Navigator.push(
              context,
              MaterialPageRoute(builder: (context) {
                return DetailScreen();
              }),
            );
          },
        ),
      ),
    );
  }
}

class DetailScreen extends StatelessWidget {
  @override
  Widget build(BuildContext context) {
    return Scaffold(
      appBar: AppBar(),
      body: Center(
        child: FlatButton(
          child: Text('Pop!'),
          onPressed: () {
            Navigator.pop(context);
          },
        ),
      ),
    );
  }
}
When push() is called, the DetailScreen widget is placed on top of the HomeScreen widget like this:
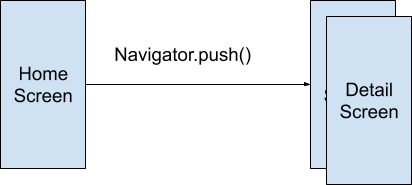
The previous screen (HomeScreen) is still part of the widget tree, so any State object associated with it stays around while DetailScreen is visible.
Named routes
Flutter also supports named routes, which are defined in the routes parameter on MaterialApp or CupertinoApp:
import 'package:flutter/material.dart';

void main() {
  runApp(Nav2App());
}

class Nav2App extends StatelessWidget {
  @override
  Widget build(BuildContext context) {
    return MaterialApp(
      routes: {
        '/': (context) => HomeScreen(),
        '/details': (context) => DetailScreen(),
      },
    );
  }
}

class HomeScreen extends StatelessWidget {
  @override
  Widget build(BuildContext context) {
    return Scaffold(
      appBar: AppBar(),
      body: Center(
        child: FlatButton(
          child: Text('View Details'),
          onPressed: () {
            Navigator.pushNamed(
              context,
              '/details',
            );
          },
        ),
      ),
    );
  }
}

class DetailScreen extends StatelessWidget {
  @override
  Widget build(BuildContext context) {
    return Scaffold(
      appBar: AppBar(),
      body: Center(
        child: FlatButton(
          child: Text('Pop!'),
          onPressed: () {
            Navigator.pop(context);
          },
        ),
      ),
    );
  }
}
These routes must be predefined. Although you can pass arguments to a named route, you can’t parse arguments from the route itself. For example, if the app is run on the web, you can’t parse the ID from a route like /details/:id.
Advanced named routes with onGenerateRoute
A more flexible way to handle named routes is by using onGenerateRoute. This API gives you the ability to handle all paths:
onGenerateRoute: (settings) {
  // Handle '/'
  if (settings.name == '/') {
    return MaterialPageRoute(builder: (context) => HomeScreen());
  }

  // Handle '/details/:id'
  var uri = Uri.parse(settings.name);
  if (uri.pathSegments.length == 2 &&
      uri.pathSegments.first == 'details') {
    var id = uri.pathSegments[1];
    return MaterialPageRoute(builder: (context) => DetailScreen(id: id));
  }

  return MaterialPageRoute(builder: (context) => UnknownScreen());
},
Here’s the complete example:
import 'package:flutter/material.dart';

void main() {
  runApp(Nav2App());
}

class Nav2App extends StatelessWidget {
  @override
  Widget build(BuildContext context) {
    return MaterialApp(
      onGenerateRoute: (settings) {
        // Handle '/'
        if (settings.name == '/') {
          return MaterialPageRoute(builder: (context) => HomeScreen());
        }

        // Handle '/details/:id'
        var uri = Uri.parse(settings.name);
        if (uri.pathSegments.length == 2 &&
            uri.pathSegments.first == 'details') {
          var id = uri.pathSegments[1];
          return MaterialPageRoute(builder: (context) => DetailScreen(id: id));
        }

        return MaterialPageRoute(builder: (context) => UnknownScreen());
      },
    );
  }
}

class HomeScreen extends StatelessWidget {
  @override
  Widget build(BuildContext context) {
    return Scaffold(
      appBar: AppBar(),
      body: Center(
        child: FlatButton(
          child: Text('View Details'),
          onPressed: () {
            Navigator.pushNamed(
              context,
              '/details/1',
            );
          },
        ),
      ),
    );
  }
}

class DetailScreen extends StatelessWidget {
  String id;

  DetailScreen({
    this.id,
  });

  @override
  Widget build(BuildContext context) {
    return Scaffold(
      appBar: AppBar(),
      body: Center(
        child: Column(
          mainAxisAlignment: MainAxisAlignment.center,
          children: [
            Text('Viewing details for item $id'),
            FlatButton(
              child: Text('Pop!'),
              onPressed: () {
                Navigator.pop(context);
              },
            ),
          ],
        ),
      ),
    );
  }
}

class UnknownScreen extends StatelessWidget {
  @override
  Widget build(BuildContext context) {
    return Scaffold(
      appBar: AppBar(),
      body: Center(
        child: Text('404!'),
      ),
    );
  }
}
Here, settings is an instance of RouteSettings. The name and arguments fields are the values that were provided when Navigator.pushNamed was called, or what initialRoute is set to.
Navigator 2.0
The Navigator 2.0 API adds new classes to the framework in order to make the app’s screens a function of the app state and to provide the ability to parse routes from the underlying platform (like web URLs). Here’s an overview of what’s new:
- Page — an immutable object used to set the navigator’s history stack.
- Router — configures the list of pages to be displayed by the Navigator. Usually this list of pages changes based on the underlying platform, or on the state of the app changing.
- RouteInformationParser, which takes the RouteInformation from RouteInformationProvider and parses it into a user-defined data type.
- RouterDelegate — defines app-specific behavior of how the Router learns about changes in app state and how it responds to them. Its job is to listen to the RouteInformationParser and the app state and build the Navigator with the current list of Pages.
- BackButtonDispatcher — reports back button presses to the Router.
The following diagram shows how the RouterDelegate interacts with the Router, RouteInformationParser, and the app’s state:
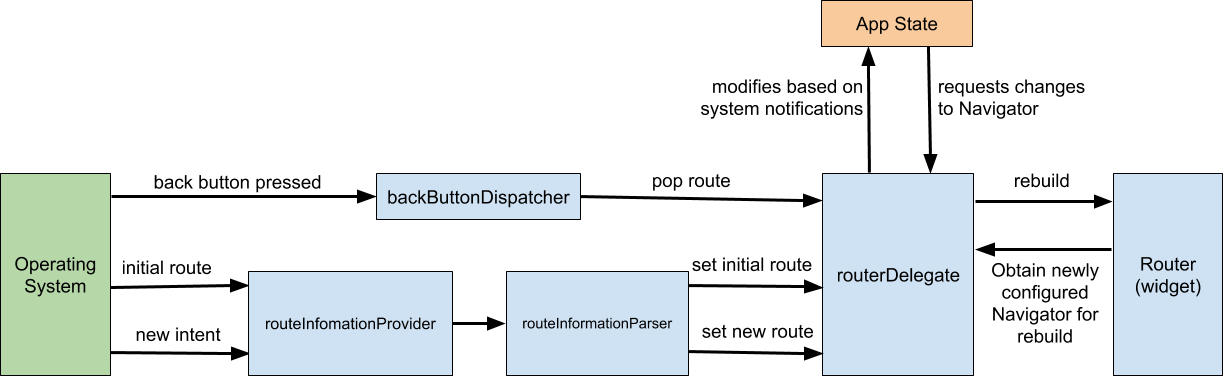
Here’s an example of how these pieces interact:
- When the platform emits a new route (for example, “books/2”) , the RouteInformationParser converts it into an abstract data type T that you define in your app (for example, a class called BooksRoutePath).
- RouterDelegate’s setNewRoutePath method is called with this data type, and must update the application state to reflect the change (for example, by setting the selectedBookId) and call notifyListeners.
- When notifyListeners is called, it tells the Router to rebuild the RouterDelegate (using its build() method) RouterDelegate.build() returns a new Navigator, whose pages now reflect the change to the app state (for example, the selectedBookId).
------------------------------------------------------------------------
Last update on 17 Aug 2022
---