GatsbyJS - Add Dynamic Images from Data
Information drawn from
In Part 3, you used gatsby-plugin-image to add static images to your home page. Now that you’ve worked a bit more with Gatsby’s data layer, it’s time to revisit gatsby-plugin-image. This time, you’ll learn how to add dynamic images to your site.
In this part of the Tutorial, you’ll use the dynamic GatsbyImage component to add hero images to each of your blog posts.
By the end of this part of the Tutorial, you will be able to:
- Use the GatsbyImage component to create images dynamically from data.
What’s the difference between GatsbyImage and StaticImage?
Back in Part 3 of the Tutorial, you learned about how to use the StaticImage component from gatsby-plugin-image.
How do you know whether to use the StaticImage component or the GatsbyImage component? The decision ultimately comes down to whether or not your image source is going to be the same every time the component renders.
The StaticImage component is for static image sources, like a hard-coded file path or remote URL. In other words, the source for your image is always going to be the same every time the component renders.
The GatsbyImage component is for dynamic image sources, like if the image source gets passed in as a prop.
In this part of the Tutorial, you’ll add a hero image to your blog post page template. You’ll also add some frontmatter data to your blog post .mdx files to specify which image to use for each post. Since the image source you’ll load in the page template will change for each blog post, you’ll use the GatsbyImage component.
## Add hero images to blog post frontmatter
Many blog sites include a hero image at the top of each post. These images are usually large, high-quality photos that are meant to grab the reader’s attention and make them want to stay on the page longer.
The steps below will help you find and download some photos for your hero images and add them to the frontmatter for each of your blog posts.
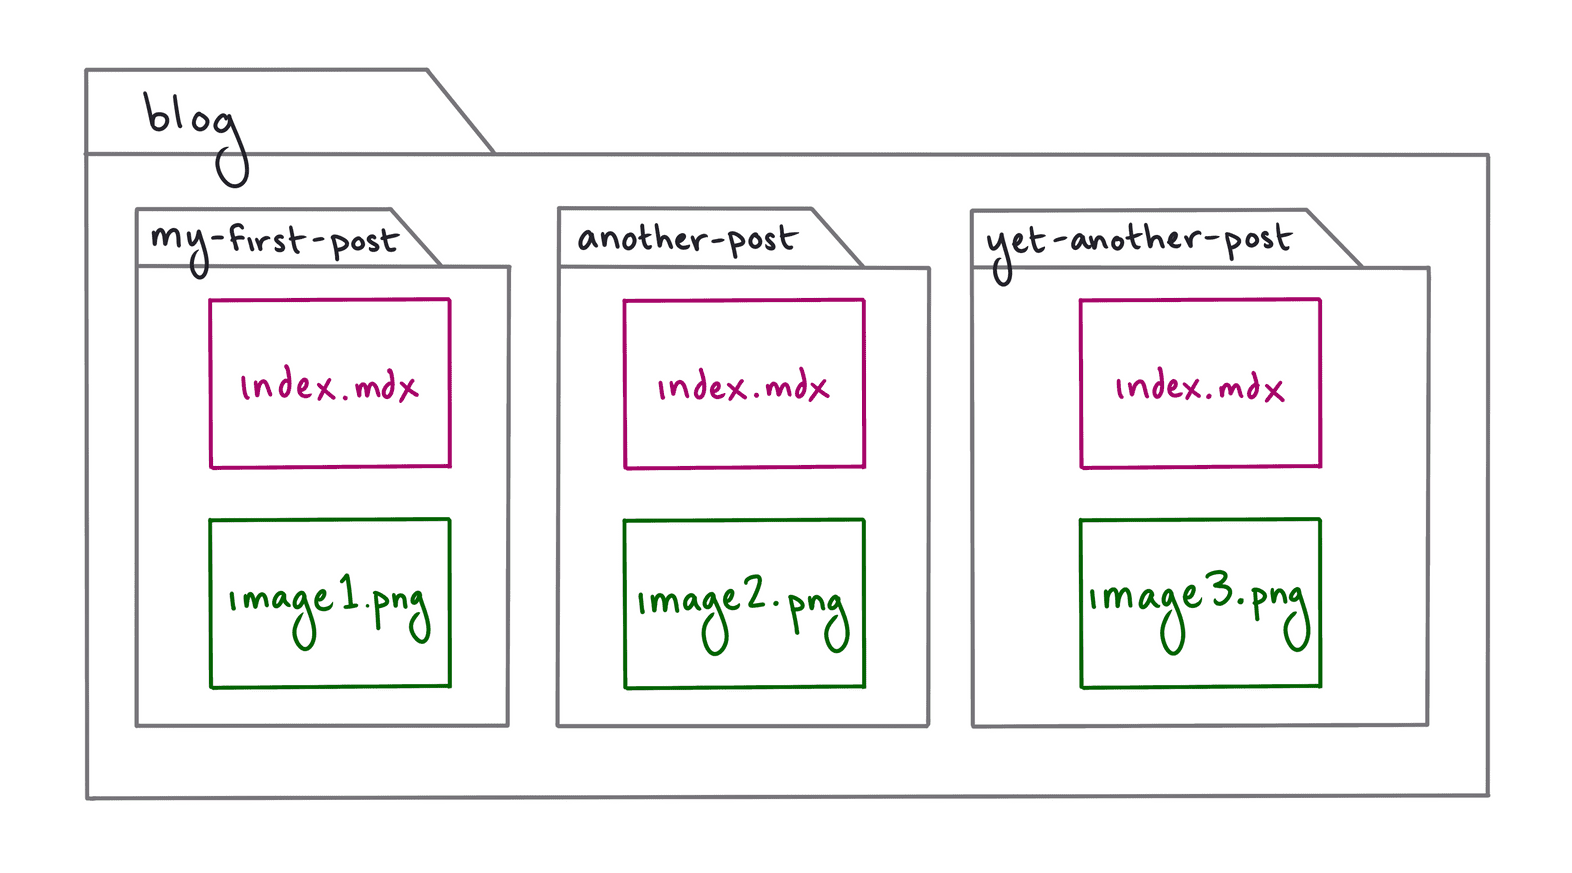
Start by organizing the blog directory with all your MDX posts. First, create a new subdirectory in your blog folder for each post. Then, rename each of your .mdx files to index.mdx (to prevent the routes from ending up with a duplicated path parameter, like blog/my-post/my-post/). For example, a post at blog/my-first-post.mdx would move to blog/my-first-post/index.mdx. Similarly, a post at blog/another-post.mdx would move to blog/another-post/index.mdx.
Note: After you move or rename your .mdx files, you’ll need to stop and restart your local development server for your changes to be picked up.

Use a website like Unsplash to find some pretty, freely usable images. For best results, choose photos with a landscape (horizontal) orientation, since those will fit on your screen more easily.
When you’ve found a photo that you like, download it and add it to subdirectory for one of your blog posts. Continue downloading photos until you have a different hero image for each post.
Pro Tip: Sometimes, the images you download from the internet can be a little too high quality. If you know your site will only ever render an image at 1000 pixels wide, there’s no point in having a source image that’s 5000 pixels wide. All those extra pixels mean extra work to process and optimize your images, which can slow down build times. As a general guideline, it’s a good idea to preoptimize your image files by resizing them to be no more than twice the maximum size they’ll be rendered at. For example, if your layout is 600 pixels wide, then the highest resolution image you will need is 1200 pixels (to account for 2x pixel density). For more detailed information, refer to the doc on Preoptimizing Your Images.
Next, add some additional frontmatter fields to each of your blog posts:
- hero_image: the relative path to the hero image file for that post
- hero_image_alt: a short description of the image, to be used as alternative text for screen readers or in case the image doesn’t load correctly
- hero_image_credit_text: the text to display to give the photographer credit for the hero image
- hero_image_credit_link: a link to the page where your hero image was downloaded from
blog/my-first-post/index.mdx
---
title: "My First Post"
date: "2021-07-23"
hero_image: "./christopher-ayme-ocZ-_Y7-Ptg-unsplash.jpg"
hero_image_alt: "A gray pitbull relaxing on the sidewalk with its tongue hanging out"
hero_image_credit_text: "Christopher Ayme"
hero_image_credit_link: "https://unsplash.com/photos/ocZ-_Y7-Ptg"
---
...
blog/another-post/index.mdx Copyblog/another-post/index.mdx: copy code to clipboard
---
title: "Another Post"
date: "2021-07-24"
hero_image: "./anthony-duran-eLUBGqKGdE4-unsplash.jpg"
hero_image_alt: "A grey and white pitbull wading happily in a pool"
hero_image_credit_text: "Anthony Duran"
hero_image_credit_link: "https://unsplash.com/photos/eLUBGqKGdE4"
---
...
blog/yet-another-post/index.mdx
---
title: "Yet Another Post"
date: "2021-07-25"
hero_image: "./jane-almon-7rriIaBH6JY-unsplash.jpg"
hero_image_credit_text: "Jane Almon"
hero_image_credit_link: "https://unsplash.com/photos/7rriIaBH6JY"
---
...
Now that your hero images are set up, it’s time to connect them to the data layer so you can pull them into your blog post page template.
Install and configure gatsby-transformer-sharp
In order to use the GatsbyImage component, you’ll need to add the gatsby-transformer-sharp transformer plugin to your site.
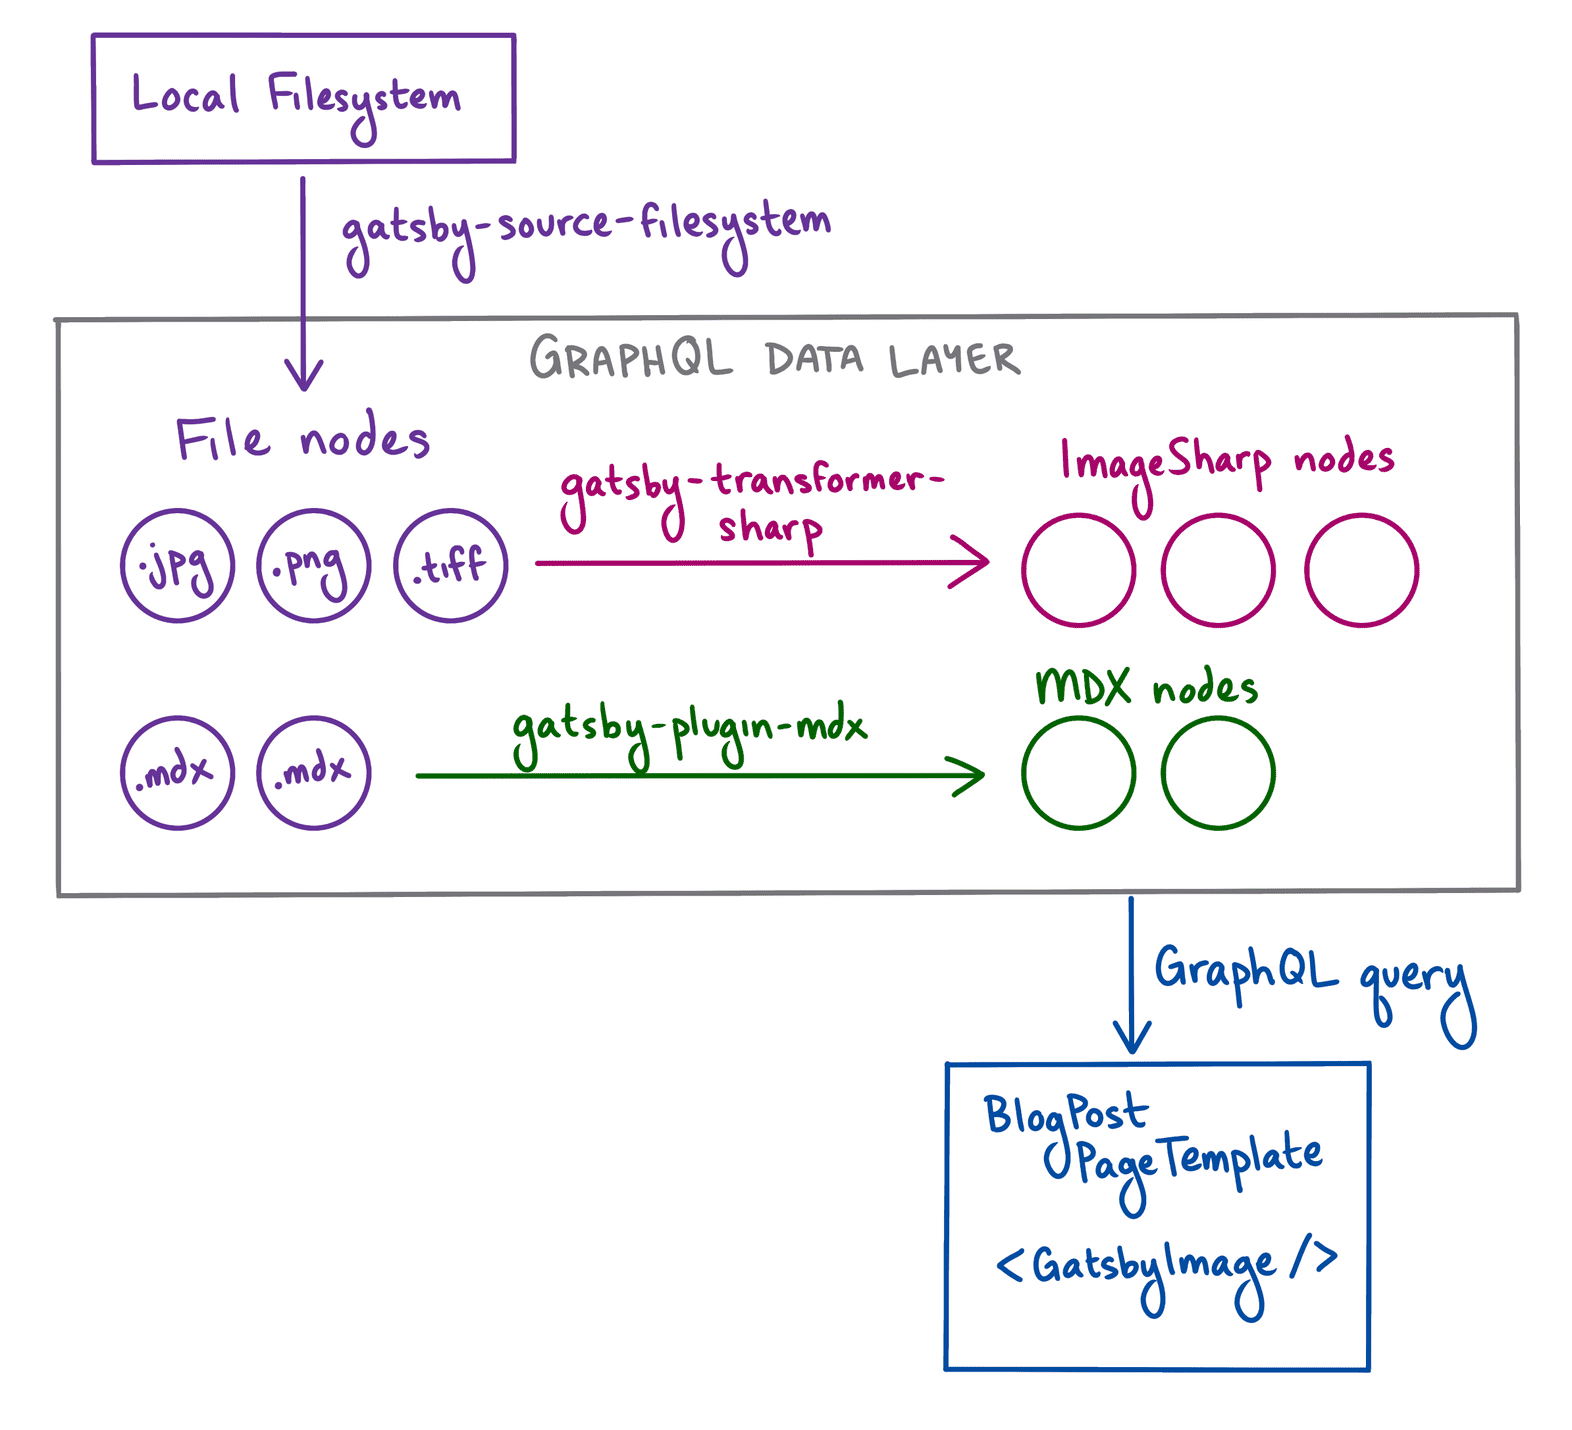
When Gatsby adds nodes to the data layer at build time, the gatsby-transformer-sharp plugin looks for any File nodes that end with an image extension (like .png or .jpg) and creates an ImageSharp node for that file.
In the terminal, run the following command to install gatsby-transformer-sharp:
npm install gatsby-transformer-sharp
Add gatsby-transformer-sharp to the plugins array in your gatsby-config.js file.
gatsby-config.js
module.exports = {
  siteMetadata: {
    title: "My First Gatsby Site",
  },
  plugins: [
    // ...existing plugins
    "gatsby-transformer-sharp",
  ],
}
Since you’ve added gatsby-transformer-sharp to your site, you’ll need to restart your local development server to see the changes in GraphiQL. You’ll take a closer look at GraphiQL in the next step.
Render hero image in the blog post page template
With all the necessary tools in place, you’re ready to add your hero image to your blog post page template.
Task: Use GraphiQL to build the query
First, you’ll use GraphiQL to add the hero image frontmatter fields to the GraphQL query for your blog post page template.
Open GraphiQL by going to localhost:8000/___graphql in a web browser. Start by copying your existing blog post page query into the GraphiQL Query Editor pane. Run it once to make sure everything is working correctly.
Note: You’ll need to set up an object in the Query Variables pane with an id that matches one of your posts. Refer to Part 6 section on query variables if you need a refresher on how to set that up.
query ($id: String) {
  mdx(id: {eq: $id}) {
    frontmatter {
      title
      date(formatString: "MMMM D, YYYY")
    }
    body
  }
}
{
  "data": {
    "mdx": {
      "frontmatter": {
        "title": "My First Post",
        "date": "July 23, 2021",
      },
      "body": "..."
    }
  },
  "extensions": {}
}
In the Explorer pane, check the boxes for the hero_image_alt, hero_image_credit_link, and hero_image_credit_text fields. When you run your query, you should get back a response something like the JSON object below.
Note: Remember to scroll down to the blue frontmatter field, which is lower than the purple frontmatter: argument.
query ($id: String) {
  mdx(id: {eq: $id}) {
    frontmatter {
      title
      date(formatString: "MMMM D, YYYY")
      hero_image_alt
      hero_image_credit_link
      hero_image_credit_text
    }
    body
  }
}
{
  "data": {
    "mdx": {
      "frontmatter": {
        "title": "My First Post",
        "date": "July 23, 2021",
        "hero_image_alt": "A gray pitbull relaxing on the sidewalk with its tongue hanging out",
        "hero_image_credit_link": "https://unsplash.com/photos/ocZ-_Y7-Ptg",
        "hero_image_credit_text": "Christopher Ayme"
      },
      "body": "..."
    }
  },
  "extensions": {}
}
Adding the hero_image field itself is a bit more involved. Within the hero_image field, toggle the childImageSharp field, and then check the box for the gatsbyImageData field. Now your query should look like this:
query ($id: String) {
  mdx(id: {eq: $id}) {
    frontmatter {
      title
      date(formatString: "MMMM D, YYYY")
      hero_image_alt
      hero_image_credit_link
      hero_image_credit_text
      hero_image {
        childImageSharp {
          gatsbyImageData
        }
      }
    }
    body
  }
}
Pro Tip: How does GraphiQL know to add extra fields to the hero_image frontmatter field?
When Gatsby builds your site, it creates a GraphQL schema that describes the different types of data in the data layer. As Gatsby builds that schema, it tries to guess the type of data for each field. This process is called schema inference.
Gatsby can tell that the hero_image field from your MDX frontmatter matches a File node, so it lets you query the File fields for that node. Similarly, gatsby-transformer-sharp can tell that the file is an image, so it also lets you query the ImageSharp fields for that node.
Run your query to see what data you get back in the response. It should mostly look like the response you got back before, but this time with an extra hero_image object:
{
  "data": {
    "mdx": {
      "frontmatter": {
        // ...
        "hero_image": {
          "childImageSharp": [
            {
              "gatsbyImageData": {
                "layout": "constrained",
                "backgroundColor": "#282828",
                "images": {
                  "fallback": {
                    "src": "/static/402ec135e08c3b799c16c08a82ae2dd8/68193/christopher-ayme-ocZ-_Y7-Ptg-unsplash.jpg",
                    "srcSet": "/static/402ec135e08c3b799c16c08a82ae2dd8/86d57/christopher-ayme-ocZ-_Y7-Ptg-unsplash.jpg 919w,\n/static/402ec135e08c3b799c16c08a82ae2dd8/075d8/christopher-ayme-ocZ-_Y7-Ptg-unsplash.jpg 1839w,\n/static/402ec135e08c3b799c16c08a82ae2dd8/68193/christopher-ayme-ocZ-_Y7-Ptg-unsplash.jpg 3677w",
                    "sizes": "(min-width: 3677px) 3677px, 100vw"
                  },
                  "sources": [
                    {
                      "srcSet": "/static/402ec135e08c3b799c16c08a82ae2dd8/6b4aa/christopher-ayme-ocZ-_Y7-Ptg-unsplash.webp 919w,\n/static/402ec135e08c3b799c16c08a82ae2dd8/0fe0b/christopher-ayme-ocZ-_Y7-Ptg-unsplash.webp 1839w,\n/static/402ec135e08c3b799c16c08a82ae2dd8/5d6d7/christopher-ayme-ocZ-_Y7-Ptg-unsplash.webp 3677w",
                      "type": "image/webp",
                      "sizes": "(min-width: 3677px) 3677px, 100vw"
                    }
                  ]
                },
                "width": 3677,
                "height": 2456
              }
            }
          ]
        }
      },
      "body": "..."
    }
  },
  "extensions": {}
}
If you take a closer look at the gatsbyImageData object on the hero_image.childImageSharp field, you’ll see that it contains a bunch of information about the hero image for that post: dimensions, file paths for the images at different sizes, fallback images to use as a placeholder while the image loads. All this data gets calculated by gatsby-plugin-sharp at build time. The gatsbyImageData object in your response has the same structure that the GatsbyImage component needs to render an image.
Note: You might have noticed that the gatsbyImageData field in GraphiQL accepts several arguments, like aspectRatio, formats, or width. You can use these arguments to pass in extra data about how you want the Sharp image processing library to create your optimized images. These options are equivalent to the ones you would pass into the StaticImage component as props. For more information, see the gatsby-plugin-image Reference Guide.
Task: Add hero image using GatsbyImage component
Once you have your GraphQL query set up, you can add it to your blog post page template.
Replace your existing page query with the query you built in GraphiQL that includes the hero image frontmatter fields.
src/pages/blog/{mdx.slug}.js
// imports
const BlogPost = ({ data }) => {
  return (
    // ...
  )
}
export const query = graphql`
  query($id: String) {
    mdx(id: {eq: $id}) {
      body
      frontmatter {
        title
        date(formatString: "MMMM DD, YYYY")
        hero_image_alt
        hero_image_credit_link
        hero_image_credit_text
        hero_image {
          childImageSharp {
            gatsbyImageData
          }
        }
      }
    }
  }
`
export default BlogPost
Import the GatsbyImage component and the getImage helper function from the gatsby-plugin-image package.
src/pages/blog/{mdx.slug}.js
import * as React from 'react'
import { graphql } from 'gatsby'
import { MDXRenderer } from 'gatsby-plugin-mdx'
import { GatsbyImage, getImage } from 'gatsby-plugin-image'
import Layout from '../../components/layout'
// ...
Use the getImage helper function to get back the gatsbyImageData object from the hero_image field. src/pages/blog/{mdx.slug}.js
// imports
const BlogPost = ({ data }) => {
  const image = getImage(data.mdx.frontmatter.hero_image)
  return (
    // ...
  )
}
// ...
Note: getImage is a helper function that takes in a File node or an ImageSharp node and returns the gatsbyImageData object for that node. You can use it to keep your code a little cleaner and easier to read. Without the getImage helper function, you’d have to type out data.mdx.frontmatter.hero_image.childImageSharp.gatsbyImageData (which is longer, but gives you back the same data).
Use the GatsbyImage component from gatsby-plugin-image to render the hero image data. You should pass GatsbyImage two props:
- image: the gatsbyImageData object for your hero_image field
- alt: the alternative text for your image, from the hero_image_alt field
src/pages/blog/{mdx.slug}.js
return (
  <Layout pageTitle={data.mdx.frontmatter.title}>
    <p>Posted: {data.mdx.frontmatter.date}</p>
    <GatsbyImage
      image={image}
      alt={data.mdx.frontmatter.hero_image_alt}
    />
    <MDXRenderer>
      {data.mdx.body}
    </MDXRenderer>
  </Layout>
)
Now, when you visit each of your blog post pages, you should see the corresponding hero image rendered before the body of your post!
Task: Add image credit after hero image
It’s important to give credit to people whose work you use in your own site. The last piece of including hero images to your site is to add a paragraph to give credit to the photographer.
Pro Tip: Since the credit link goes to an external page (in other words, one that’s not part of your site), you can use the HTML tag instead of the Gatsby Link component. Remember, Gatsby’s Link component only gives performance benefits for internal links to other pages within your site.
src/pages/blog/{mdx.slug}.js
// imports
const BlogPost = ({ data }) => {
  const image = getImage(data.mdx.frontmatter.hero_image)
  return (
    <Layout pageTitle={data.mdx.frontmatter.title}>
      <p>{data.mdx.frontmatter.date}</p>
      <GatsbyImage
        image={image}
        alt={data.mdx.frontmatter.hero_image_alt}
      />
      <p>
        Photo Credit:{" "}
        <a href={data.mdx.frontmatter.hero_image_credit_link}>
          {data.mdx.frontmatter.hero_image_credit_text}
        </a>
      </p>
      <MDXRenderer>
        {data.mdx.body}
      </MDXRenderer>
    </Layout>
  )
  }
export const query = graphql`
  ...
`
export default BlogPost
Syntax Hint: You might have noticed that there’s a {“ “} after the “Photo Credit:” text <p> tag. That’s to make sure that a space gets rendered between the colon (:) and the link text. Try removing the {“ “} and see what happens. The paragraph text should end up being “Photo Credit:Author”.
### Key takeaways
- Use the StaticImage component if your component always renders the same image (from a relative path or a remote URL).
- Use the GatsbyImage component if the image source changes for different instances of your component (like if it gets passed in as a prop).
------------------------------------------------------------------------
Last update on 04 Nov 2021
---