GatsbyJS - Add Features with Plugins
Information drawn from
It can be a lot of work to build new features for a website. Luckily, by using Gatsby plugins, you can quickly add new functionality to your site without needing to build it from scratch yourself. Gatsby’s plugin ecosystem has thousands of prebuilt packages for you to choose from.
In this part of the Tutorial, you’ll learn what Gatsby plugins are and how to use them in your site.
By the end of this part of the Tutorial, you will be able to:
- Use the Gatsby Plugin Library to browse all the available plugins.
- Add a plugin to your Gatsby site.
- Configure your plugins in your gatsby-config.js file.
What is a plugin?
In Gatsby terms, a plugin is a separate npm package that you install to add extra features to your site.
There are a variety of plugins that each have different use cases. Some plugins provide pre-built components, others add analytics, others let you pull data into your site. Some plugins are built by Gatsby employees, while other plugins are built and maintained by community members. So far, there are more than 2,600 plugins to choose from. You can look through all the available plugins using the Gatsby Plugin Library.
You can think of a plugin as an accessory for your site. You don’t need to use plugins - you could build out the same functionality from scratch yourself - but they save you time. They’re like those fancy single-purpose cooking gadgets that peel apples or crush garlic. You could accomplish the same task using a regular knife, but it’s often faster to use a tool that’s built to do that one specific job really well.
You will likely use plugins in almost every Gatsby site you build. While working through the rest of the Tutorial, you’ll have many opportunities to practice installing and using plugins.
Add a plugin to your site
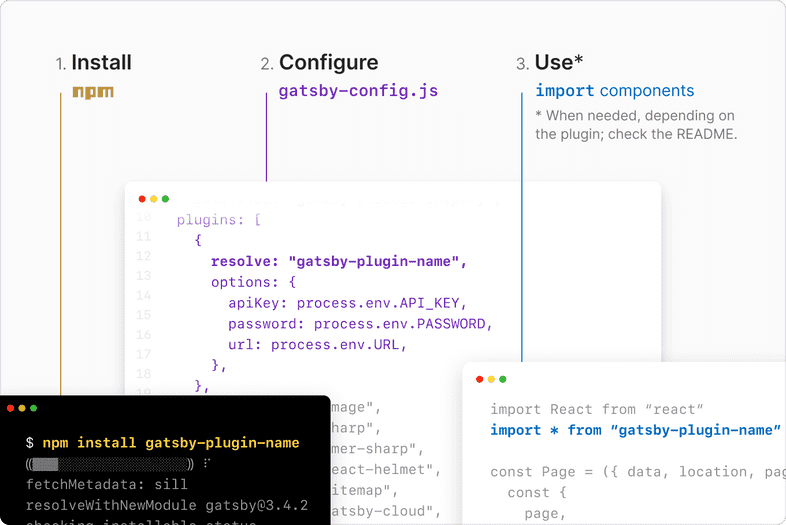
To add a plugin to your site, you’ll use the following process:
- Install the plugin using npm.
- Configure the plugin in your site’s gatsby-config.js file.
- Use the plugin features in your site, as needed.
The next few sections will walk you through the process of adding a plugin to your site. You’ll use the gatsby-plugin-image plugin to add performant images to your site.
Task: Use gatsby-plugin-image to add a static image to your home page
You can use the gatsby-plugin-image plugin to add responsive images to your site while maintaining high performance scores. gatsby-plugin-image exports a component called StaticImage, which you can use to load images from a remote URL or your local filesystem.
Follow the steps below to use the StaticImage component to add an image from a URL to your home page.
In the terminal, run the following command to install gatsby-plugin-image and its dependencies.
npm install gatsby-plugin-image gatsby-plugin-sharp gatsby-source-filesystem
The StaticImage component requires a few additional plugins to work. These extra plugins are called peer dependencies, and you’ll need to install them along with the gatsby-plugin-image package:
- gatsby-plugin-sharp: Handles the actual image processing that is used by gatsby-plugin-image.
- gatsby-source-filesystem: Lets you pull in data from your computer’s filesystem. (You’ll learn more about this plugin later. Just install it for now.) Tip: When adding a new plugin to your site, check the plugin README in the Gatsby Plugin Library to see if there are any special setup instructions.
Next, add the gatsby-plugin-image and gatsby-plugin-sharp plugins to your gatsby-config.js file. (Don’t worry about gatsby-source-filesystem just yet. You’ll come back to it later.) gatsby-config.js
module.exports = {
  siteMetadata: {
    title: "My First Gatsby Site",
  },
  plugins: [
    "gatsby-plugin-image",
    "gatsby-plugin-sharp",
  ],
};
– Key Gatsby Concept 💡 –
The gatsby-config.js file is a special file that Gatsby recognizes automatically. It’s where you add plugins and other site configuration.
After you update your gatsby-config.js file, your local development server has to restart in order to pick up the new changes. Sometimes it will restart itself automatically, but if you’re seeing unexpected behavior, try stopping and restarting it yourself. –.–
Now that your plugins have been installed and configured, you can use the StaticImage component in your Gatsby site! You can use the StaticImage component similarly to the way you’d use an HTML ````` tag.
The StaticImage component expects the following props:
- src (string): The URL to the image you want to load. (This is the same as what you put in the src attribute of an
HTML element.)
- alt (string): The alt text to describe the image. This gets used by screen readers or if there’s a problem loading the image.
Find an image URL online, and then use the StaticImage component to add that image to your home page:
src/pages/index.js
import * as React from 'react'
import Layout from '../components/layout'
import { StaticImage } from 'gatsby-plugin-image'
const IndexPage = () => {
  return (
    <Layout pageTitle="Home Page">
      <p>I'm making this by following the Gatsby Tutorial.</p>
      <StaticImage
        alt="Clifford, a reddish-brown pitbull, posing on a couch and looking stoically at the camera"
        src="https://pbs.twimg.com/media/E1oMV3QVgAIr1NT?format=jpg&name=large"
      />
    </Layout>
  )
}
export default IndexPage
Task: Update the static image to use a photo from your local filesystem
So far, you’ve used the StaticImage component to add an image from an external URL. But what happens if you want to use a photo that isn’t on the internet yet?
You can also use the StaticImage component to render images from your local filesystem.
Download a photo to your computer, and move it into your project folder. To keep things organized, put it in the src/images directory. Update the src prop in your home page to be a relative path to your file instead of a URL. src/pages/index.js
import * as React from 'react'
import Layout from '../components/layout'
import { StaticImage } from 'gatsby-plugin-image'
const IndexPage = () => {
  return (
    <Layout pageTitle="Home Page">
      <p>I'm making this by following the Gatsby Tutorial.</p>
      <StaticImage
        alt="Clifford, a reddish-brown pitbull, dozing in a bean bag chair"
        src="../images/clifford.jpg"
      />
    </Layout>
  )
}
export default IndexPage
Key takeaways
- A plugin is a package that lets you add new features to your site.
- Using plugins saves you development time, since it’s faster to install and configure a plugin than it is to recreate the same functionality from scratch.
- The general process for using a plugin is to install it, configure it in your gatsby-config.js file, and then use it in your site as needed.
- You can use the Gatsby Plugin Library to browse all the available plugins and learn more about how each one works.
------------------------------------------------------------------------
Last update on 03 Nov 2021
---