GatsbyJS - Create Pages Programmatically
Information drawn from
In Part 5, you added all of your blog posts to your Blog page. But that means that your Blog page will get longer and longer as you add more posts to your site. It would be better if each post lived on its own page, and then your Blog page could link out to all the different posts.
So far, the way you’ve created new pages for your Gatsby site is by creating a new file in the src/pages directory and hard-coding the page’s contents in JSX. But manually creating a new page for each post would be quite repetitive, especially since each page has the same structure: render the frontmatter and contents of an MDX file.
In this part of the Tutorial, you’ll learn how to create new pages dynamically using Gatsby’s Filesystem Route API.
By the end of this part of the Tutorial, you will be able to:
- Use Gatsby’s Filesystem Route API to dynamically create new pages for your blog posts.
- Add a query variable to a page query.
Create new routes dynamically with Gatsby’s File System Route API
When you build your Gatsby site, Gatsby creates a new route for each page component in your src/pages directory. So far, you’ve only been building one page per file: the index.js file creates the Home page, the about.js file creates the About page, and the blog.js file creates the Blog page.
But you can also use one page component to create multiple pages. Instead of hard-coding all the contents, you’ll create a template to outline the basic structure of your page, and then Gatsby can dynamically add in the specific data for each page at build time. To do that, you’ll use Gatsby’s File System Route API, which lets you create routes dynamically by naming your page files with a special syntax.
– Key Gatsby Concept: File System Route API – Gatsby’s File System Route API defines a special syntax for naming the files in your src/pages directory, which lets you dynamically create new pages for your site based on a collection of nodes in the data layer.
For example, imagine your site had a bunch of Product nodes in the data layer. You could use the File System Route API to create one product page template component. Then, when you built your site, Gatsby would combine that page template with the data for each Product node and generate a new page for each product. And if you decided you needed to make changes to your product page, you’d only have to edit the template component, and Gatsby would update all your product pages the next time it rebuilt the site.
To create a collection route:
- Decide what type of node you want to create pages from.
- Choose **which field on that node to use in the route (the URL) **for your pages.
- Create a new page component in your src/pages directory using the following naming convention: {nodeType.field}.js.
- Don’t forget to include the curly braces ({}) in your filenames to indicate the dynamic part of the route!
For example, if you wanted to create a separate page for each Product node, and you wanted to use the product’s name field in the URL, you’d create a new file at src/pages/{Product.name}.js. Then Gatsby would create those pages at routes like /water-bottle or /sweatshirt or /notebook.
–.–
In this part of the Tutorial, you’ll use Gatsby’s File System Route API to dynamically create new pages for each of your blog posts.
According to the API, you need to decide on two things before creating a collection route:
- Which type of node to create pages from.
- Which field from that node type to use in the URL.
Since your blog posts are written in MDX, you’ll use MDX as the node type to create pages from. But which field on the MDX nodes should you use?
gatsby-plugin-mdx automatically adds a slug field to each MDX node, which contains a string of the filename for the .mdx file (with the .mdx extension removed). You can see the slug field’s value for each MDX node in GraphiQL. If you run the following query:
{
  allMdx {
    nodes {
      slug
    }
  }
}
…you should get back something like the result below:
{
  "data": {
    "allMdx": {
      "nodes": [
        {
          "slug": "my-first-post"
        },
        {
          "slug": "yet-another-post"
        },
        {
          "slug": "another-post"
        }
      ]
    }
  },
  "extensions": {}
}
That looks like a good format for a URL!
Note: In this case, the slug field is a good choice because it’s human readable, which means the URLs for your blog posts will be easier for users to understand. But you can use any field in your routes, even if it contains special characters or whitespace, as Gatsby will “slugify” every route. For example, I ♥ Dogs will be converted to i-love-dogs.
Task: Create blog post page template
Now that you know what node type and field to use, you can plug them into the File System Routes naming convention. To create new pages from the slug field of your MDX nodes, you should make a new file at src/pages/{mdx.slug}.js.
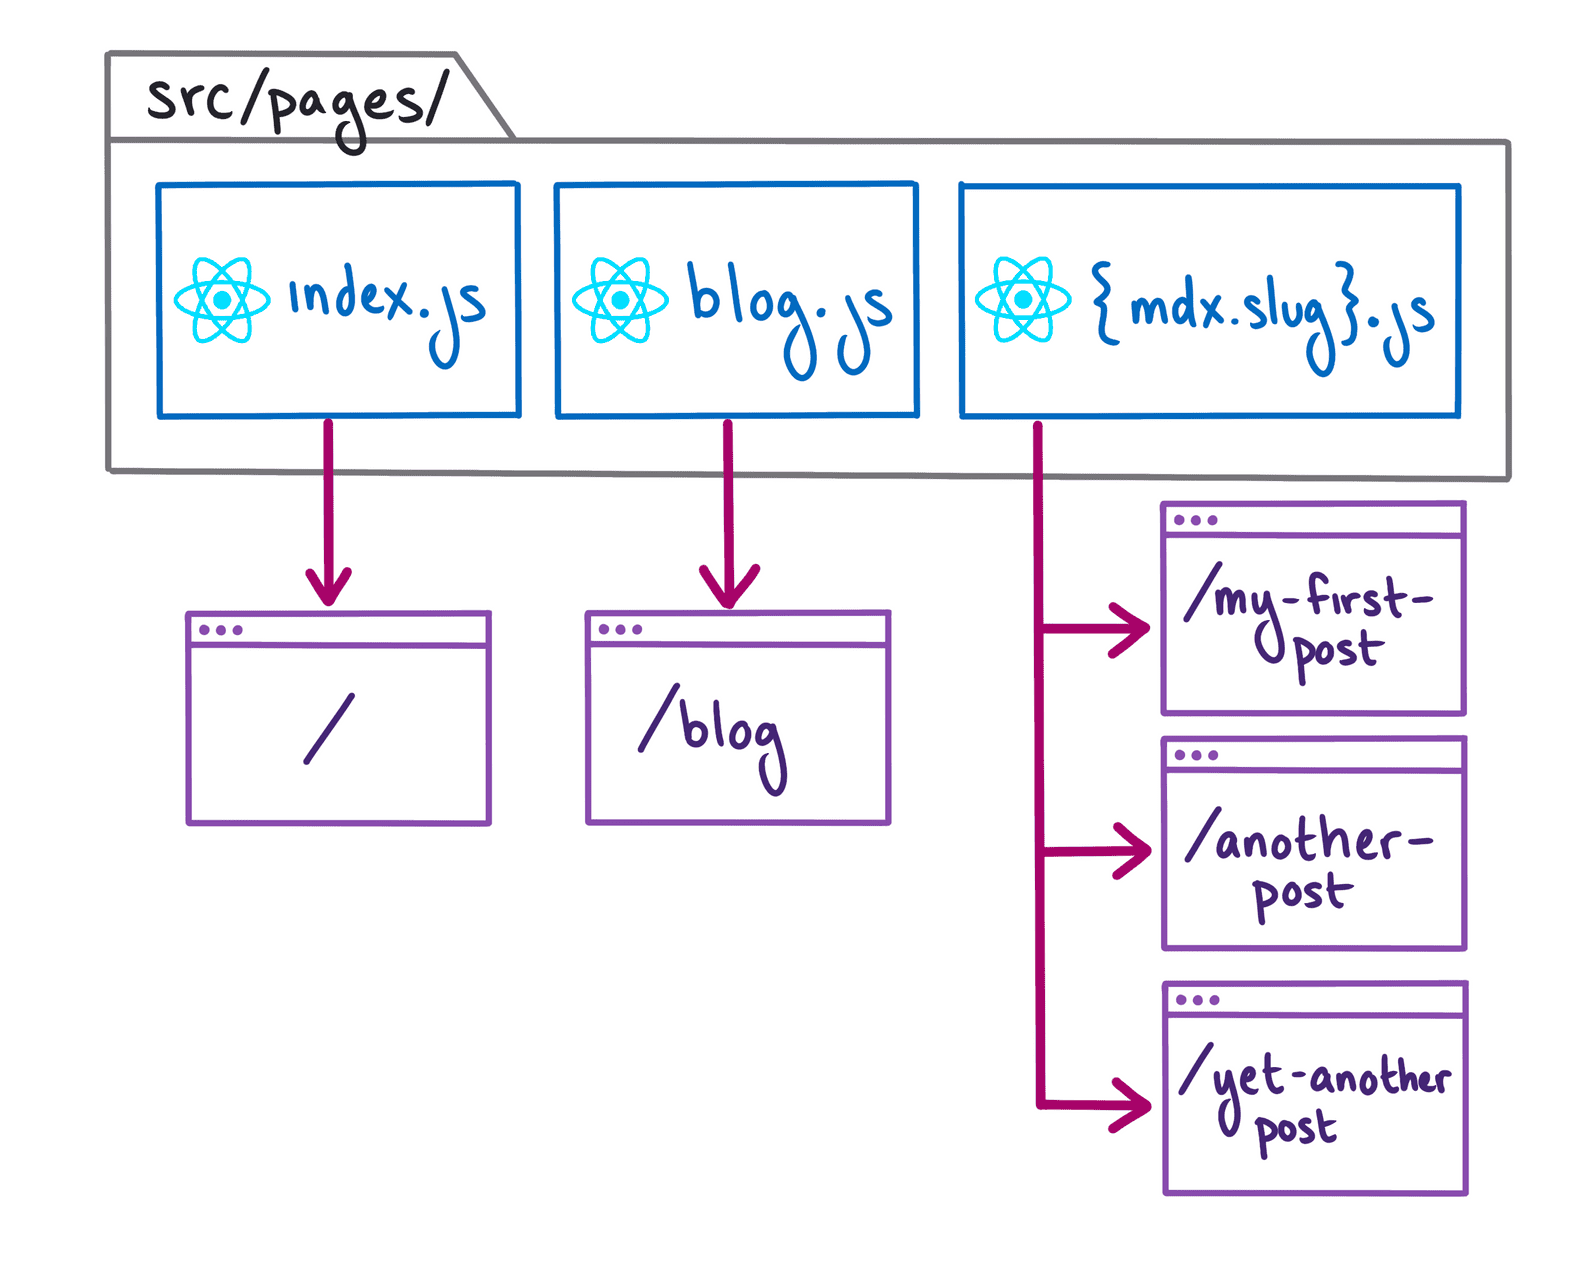
The diagram below shows the different routes that Gatsby will create when it builds your site:

A diagram showing how files in the “src/pages” directory get turned into routes for the site. Extended description below.
When you build your site, Gatsby looks at the page components in your src/pages directory and creates new pages for your site.
- src/pages/index.js lives at the / route.
- src/pages/blog.js lives at the /blog route.
- src/pages/{mdx.slug}.js gets turned into multiple routes - one for each MDX node in the data layer.
Create a new file in your src/pages directory called {mdx.slug}.js. This will be the file for your blog post page template.
Create a basic page component in your new {mdx.slug}.js file. For now, add in the Layout component, but hard code the page title and page contents. (You’ll make those dynamic later on.)
src/pages/{mdx.slug}.js
import * as React from 'react'
import Layout from '../components/layout'
const BlogPost = () => {
  return (
    <Layout pageTitle="Super Cool Blog Posts">
      <p>My blog post contents will go here (eventually).</p>
    </Layout>
  )
}
export default BlogPost
In a web browser, go to localhost:8000/my-first-post and you should see your hard-coded content. You can update your URL with the slugs for your other posts to check that identical pages were created for them too.
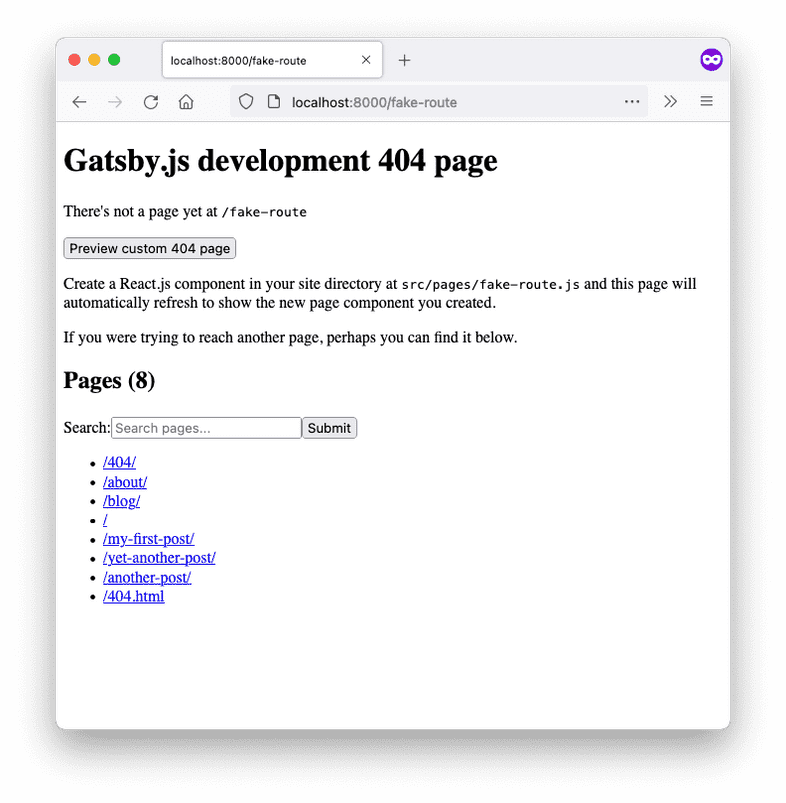
Pro Tip: Not sure which pages were created? Check out the 404 page when you run gatsby develop. (You can get to it by trying to access the URL for a page that doesn’t exist.) The bottom of the page lists the routes for all the pages Gatsby created for your site. (If you’re making changes to your routes, you’ll have to stop and restart your local development server for the list of pages on the 404 page to update.)

Task: Update route to include a /blog path parameter
So far, all of your pages have been created off the root domain of your site (localhost:8000). But it would be better (both for search engine optimization and for general organization) if you grouped all your blog posts under a /blog path parameter. That way, the URLs for all your blog posts would start with localhost:8000/blog/.
Since Gatsby builds page routes based on the folder structure inside the src/pages directory, you can add new path parameters to a page by creating subdirectories inside of src/pages.
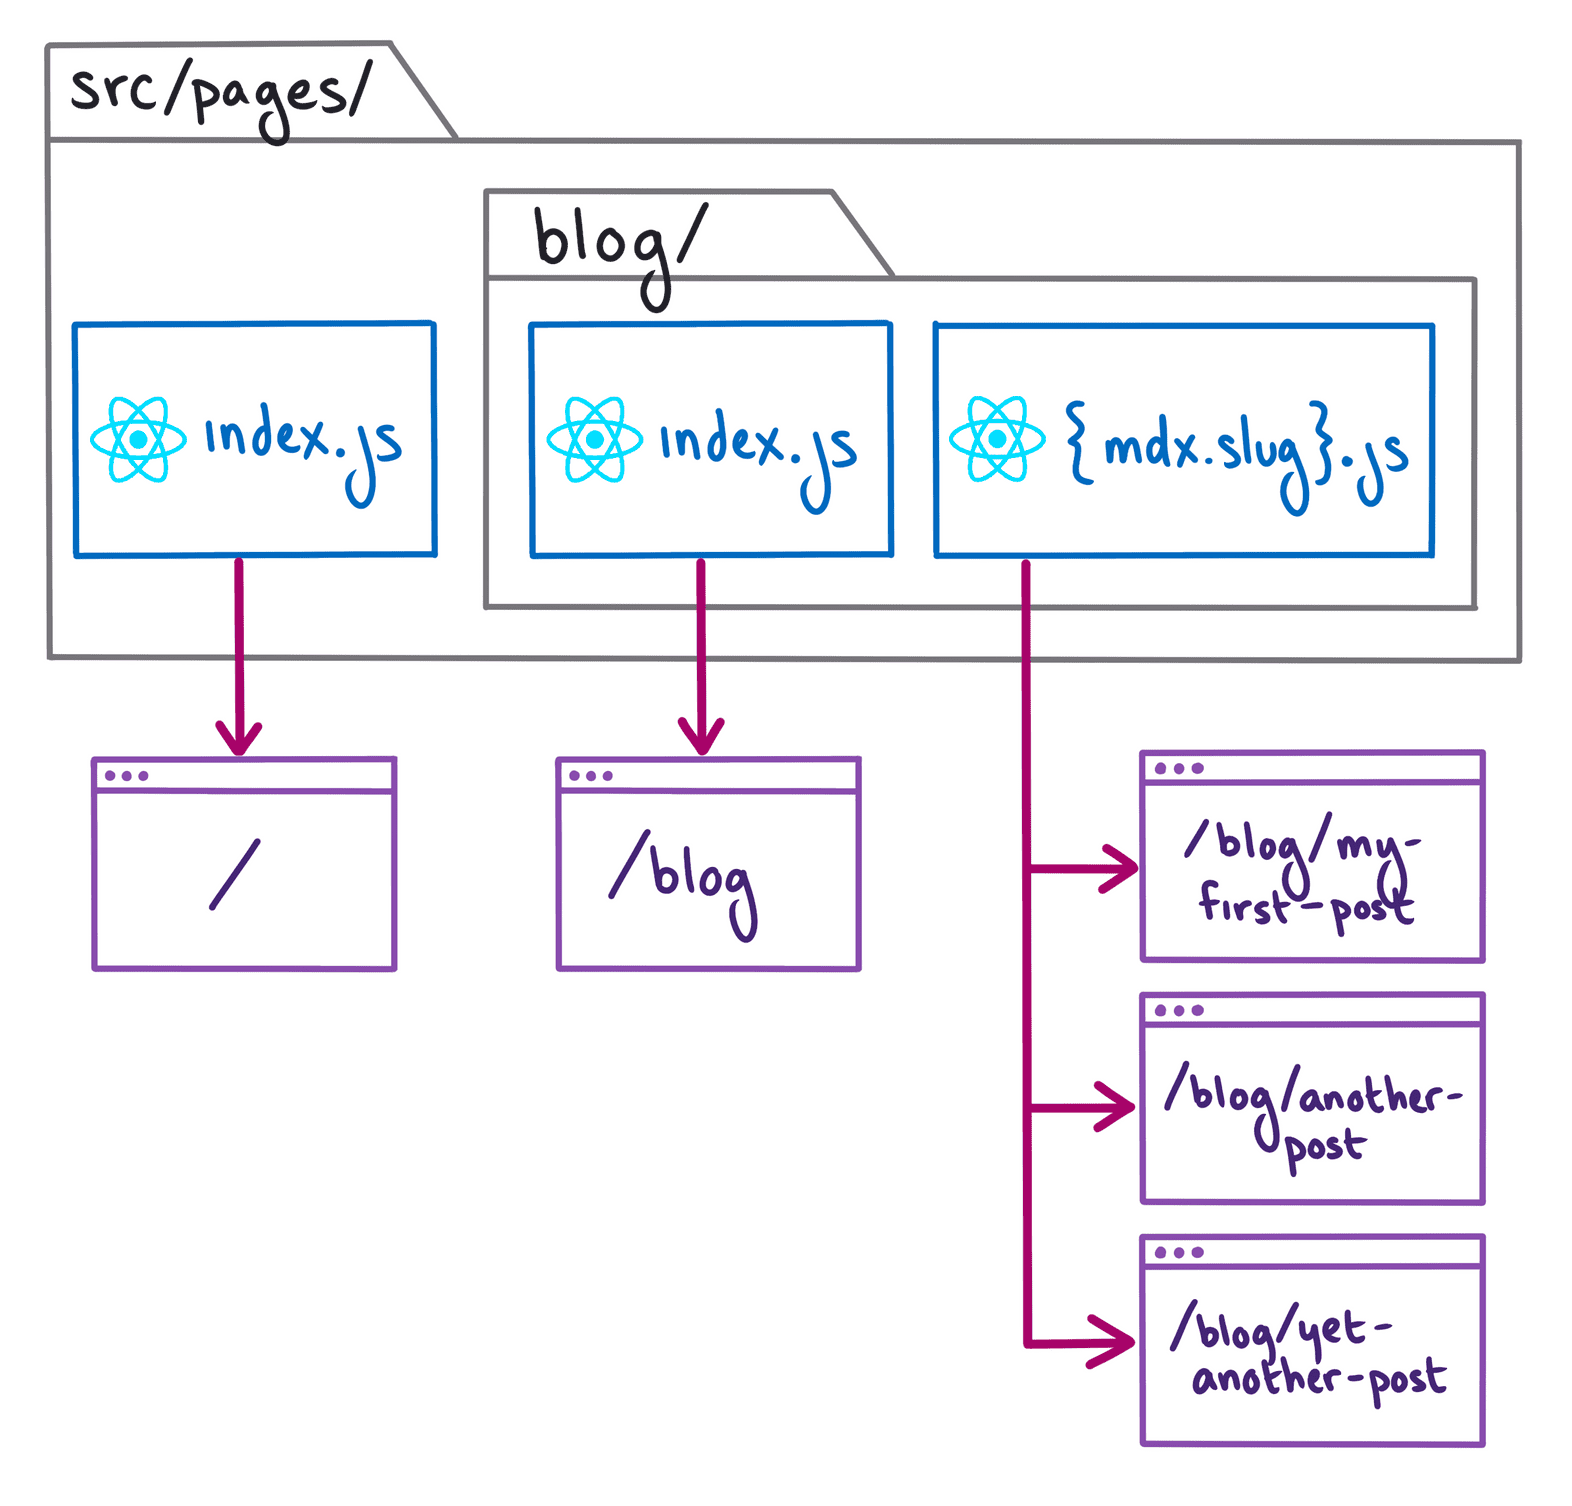
The following diagram shows an overview of the updates you’ll have to make in order to add a /blog path parameter to the routes for your blog posts. The process is also outlined in more detail below.

When Gatsby builds the pages for your site, it creates routes based on the folder structure of the src/pages directory. So if your src/pages directory contains subdirectories with page components, the name of the subdirectory will get added as a path parameter for those pages. src/pages/index.js still lives at the / route. src/pages/blog/index.js lives at the /blog route. src/pages/blog/{mdx.slug}.js gets turned into multiple routes - one for each MDX node in the data layer. Gatsby uses the MDX node with slug my-first-post to build a page that lives at the blog/my-first-post route. Gatsby uses the MDX node with slug another-post to build a page that lives at the blog/another-post route. Gatsby uses the MDX node with slug yet-another-post to build a page that lives at the blog/yet-another-post route.
Create a new folder in your src/pages directory, and call it blog.
Move the src/pages/{mdx.slug}.js file into the new blog subdirectory. Update the import for your Layout component to reflect the new folder structure:
src/pages/blog/{mdx.slug}.js
import * as React from 'react'
import Layout from '../../components/layout'
// ...
Once your local development server rebuilds your site, check in a web browser that the paths to your blog posts have updated.
For example, you should now have a page at localhost:8000/blog/my-first-post, and trying to access localhost:8000/my-first-post (without the blog path parameter) should send you to the 404 page.
Pro Tip: Gatsby caches information about your site as it builds it, to make subsequent builds faster. But sometimes, when you make changes to your site, you’ll need to empty the cache for your changes to show up. If you’re seeing unexpected behavior (like maybe your local development server isn’t picking up your new changes), you can run gatsby clean from the command line to delete the cache and start fresh on your next build. Don’t have the Gatsby CLI globally installed? Try running npx gatsby clean instead.
For organization, it would be nice to keep all your blog-related pages together. Move the src/pages/blog.js file into your new src/pages/blog directory as well.
Rename the file from blog.js to index.js. (Otherwise your blog page will move to localhost:8000/blog/blog).
You’ll also need to update the import for the Layout component to reflect the new folder structure:
src/pages/blog/index.js
import * as React from 'react'
import { graphql } from 'gatsby'
import { MDXRenderer } from 'gatsby-plugin-mdx'
import Layout from '../../components/layout'
// ...
You may need to stop and restart your local development server for the changes to be picked up.
In a web browser, check that your Blog page still shows up at localhost:8000/blog.
Nice work! You’ve now used Gatsby’s File System Route API to create pages from nodes in the data layer.
Render post contents in the blog post page template
Now that you’ve got all the pages for your posts set up, it’s time to pull in the actual post contents. You learned in Part 4 that you can pull data into your components using GraphQL queries. But how can you tell Gatsby which MDX node from the data layer to pull into each page? **To do that, you’ll need to learn about another key **GraphQL concept: query variables.
– Key GraphQL Concept: Query Variables – In GraphQL, query variables are a way to send extra data along with your request. With query variables, you can write dynamic queries that return different data based on the values you pass in.
Let’s take a look at an example in GraphiQL. In Part 5, you learned about passing arguments to fields to change the data you get back in the response. For example, you could use the query below to request data for the MDX node that has a slug field equal to “another-post”:
query MyQuery {
  mdx(slug: {eq: "another-post"}) {
    frontmatter {
      title
    }
  }
}
…which would return the following response:
{
  "data": {
    "mdx": {
      "frontmatter": {
        "title": "Another Post"
      }
    }
  },
  "extensions": {}
}
In this case, your slug value is hard coded into your GraphQL query. But what happens if you want to swap out a different value on a different page? That’s where query variables come in.
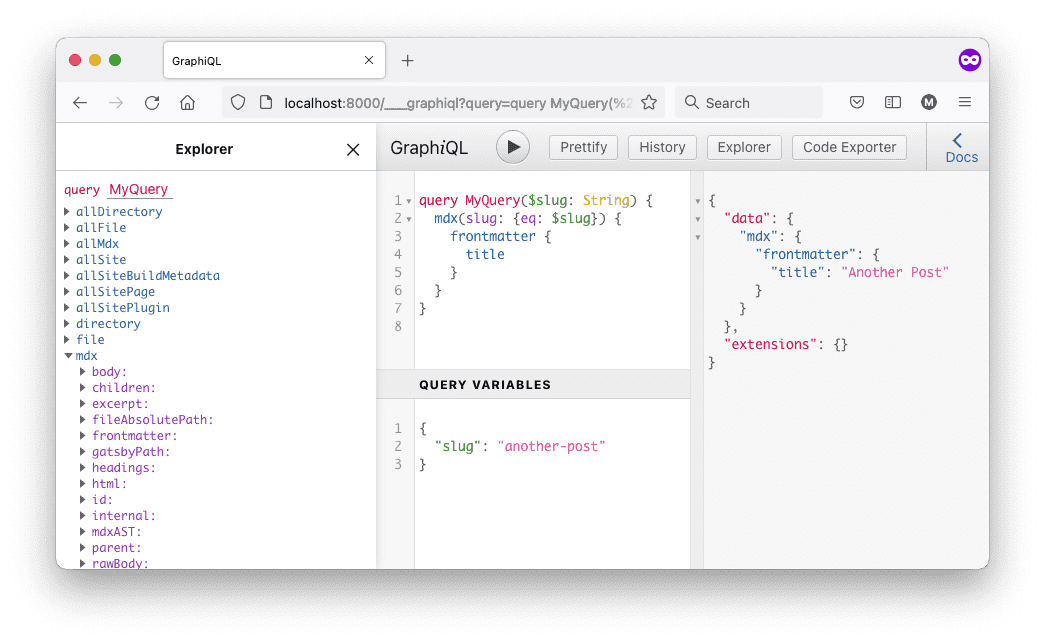
GraphiQL has a collapsible **“Query Variables” section at the bottom of the Query Editor pane. If you click on it, a new text area appears, where **you can add key-value pairs for data that you want to pass into your query. These key-value pairs should be written in JSON. For example, adding the object below to the Query Variables section passes your request a query variable called slug with a value of another-post:
{
    "slug": "another-post"
}
To use the query variable inside your query, do the following:
Define your query variable: It should include the variable name (with a $ in front of it) and its GraphQL data type. Use the query variable in your query. (You’ll need to add a $ before the variable name.) For example, here’s how you would update the previous query to use query variables instead of a field argument:
query MyQuery($slug: String) {
  mdx(slug: {eq: $slug}) {
    frontmatter {
      title
    }
  }
}
Running this new query should return the same response as the previous one without query variables. But now, you can swap out the value of your slug variable with a different value, like “my-first-post”, and your response will send back the correct node.
The diagram below shows how the query, query variables, and response all fit together in the GraphiQL interface:

A screenshot of GraphiQL in a web browser. The Query Editor pane in the middle shows the request with query variables. The Query Variables pane below shows a JSON object with a single key-value pair for the slug. The Result Window shows the single MDX node returned in the response.
Note: In Gatsby, query variables can only be used inside of page queries. (You can’t use them with the useStaticQuery hook.)
–.–
When you use Gatsby’s File System Route API, it automatically adds some props into the page template component for each page:
- The id for the data layer node used to create the page.
- The field you used to create the dynamic part of the route. (In this case, the slug field.)
Under the hood, Gatsby makes both of these values available to use as query variables in your page queries.
– Want to take a closer look? –
Add a console.log statement to print out the props for your BlogPost page component in src/pages/blog/{mdx.slug}.js. In a web browser, go to localhost:8000/blog/my-first-post and open the developer tools. In the console tab, you should see an object similar to the one below:
Object {
  // ...
  pageContext: Object {
    id: "11b3a825-30c5-551d-a713-dd748e7d554a"
    slug: "my-first-post"
  }
  // ...
}
The keys in the pageContext object get added when you create a page using the File System Route API. These are also the keys that are available for you to use as query variables in your page query for the blog post page template.
–.–
Start by using GraphiQL to create a page query for your blog post page template.
Since each page only needs data for a single MDX node, use the mdx field. The fastest way to look up nodes is using the id field, so use the id query variable instead of slug.
query MyQuery($id: String) {
  mdx(id: {eq: $id}) {
    frontmatter {
      title
      date(formatString: "MMMM D, YYYY")
    }
    body
  }
}
Tip: If you want to test out your query in GraphiQL, you’ll need to add an id key to the Query Variables section. You can copy one of the id values from running an allMdx query in GraphiQL.The JSON object in the Query Variables section should look something like the one below. (You’ll need to use your own id, as copying the one below won’t work.):
{
    "id": "11b3a825-30c5-551d-a713-dd748e7d554a"
}
Add your page query to the blog post page template.
Don’t forget to import the graphql tag! You should also delete the query name MyQuery or replace it with a unique name. src/pages/blog/{mdx.slug}.js
import * as React from 'react'
import { graphql } from 'gatsby'
import Layout from '../../components/layout'
const BlogPost = () => {
  return (
    <Layout pageTitle="Super Cool Blog Posts">
      <p>My blog post contents will go here (eventually).</p>
    </Layout>
  )
}
export const query = graphql`
  query ($id: String) {
    mdx(id: {eq: $id}) {
      frontmatter {
        title
        date(formatString: "MMMM D, YYYY")
      }
      body
    }
  }
`
export default BlogPost
In Part 4, you learned that Gatsby passes in the results from your page query into your page component as a data prop. You can update your BlogPost component to use the data prop and render the contents of your blog post. (Remember to import MDXRenderer so that you can render the body of your post!)
src/pages/blog/{mdx.slug}.js
import * as React from 'react'
import { graphql } from 'gatsby'
import { MDXRenderer } from 'gatsby-plugin-mdx'
import Layout from '../../components/layout'
const BlogPost = ({ data }) => {
  return (
    <Layout pageTitle={data.mdx.frontmatter.title}>
      <p>{data.mdx.frontmatter.date}</p>
      <MDXRenderer>
        {data.mdx.body}
      </MDXRenderer>
    </Layout>
  )
}
export const query = graphql`
  query ($id: String) {
    mdx(id: {eq: $id}) {
      frontmatter {
        title
        date(formatString: "MMMM D, YYYY")
      }
      body
    }
  }
`
export default BlogPost
In your web browser, go to one of your blog post pages (like localhost:8000/blog/my-first-post). You should see the contents of your blog post rendered in their own page!
Update Blog page to link to each post
So far, you’ve used the File System Route API and GraphQL query variables to create separate pages for each of your blog posts.
The last step of Part 6 is to clean up your Blog page. Instead of rendering the full contents of your blog posts, the Blog page should link out to the new post pages you just created.
In your src/pages/blog/index.js file, remove the body field from your JSX and your page query. You can also get rid of the MDXRenderer component.
src/pages/blog/index.js
import * as React from 'react'
import { graphql } from 'gatsby'
import Layout from '../../components/layout'
const BlogPage = ({ data }) => {
  return (
    <Layout pageTitle="My Blog Posts">
      {
        data.allMdx.nodes.map(node => (
          <article key={node.id}>
            <h2>{node.frontmatter.title}</h2>
            <p>Posted: {node.frontmatter.date}</p>
          </article>
        ))
      }
    </Layout>
  )
}
export const query = graphql`
  query {
    allMdx(sort: {fields: frontmatter___date, order: DESC}) {
      nodes {
        frontmatter {
          date(formatString: "MMMM D, YYYY")
          title
        }
        id
      }
    }
  }
`
export default BlogPage
Add the slug field to your page query, and use it to turn the post title into a link to the post page.
Since these links are between pages on your own site, you can use Gatsby’s Link component to get some extra performance benefits. If you use absolute URLs, you’ll need to add the extra /blog/ path parameter, since the slug field only contains the last part of the path (like my-first-post).
src/pages/blog/index.js
import * as React from 'react'
import { Link, graphql } from 'gatsby'
import Layout from '../../components/layout'
const BlogPage = ({ data }) => {
  return (
    <Layout pageTitle="My Blog Posts">
      {
        data.allMdx.nodes.map(node => (
          <article key={node.id}>
            <h2>
              <Link to={`/blog/${node.slug}`}>
                {node.frontmatter.title}
              </Link>
            </h2>
            <p>Posted: {node.frontmatter.date}</p>
          </article>
        ))
      }
    </Layout>
  )
}
export const query = graphql`
  query {
    allMdx(sort: {fields: frontmatter___date, order: DESC}) {
      nodes {
        frontmatter {
          date(formatString: "MMMM D, YYYY")
          title
        }
        id
        slug
      }
    }
  }
`
export default BlogPage
In a web browser, go to localhost:8000/blog.
Congratulations, you now have a multi-page blog site! Try adding some new .mdx files to your top-level blog directory. They should get added to your Blog page automatically when your site rebuilds!
Summary
Take a moment to think back on what you’ve learned so far. Challenge yourself to answer the following questions from memory:
What is the File System Route API used for? What is the syntax for creating a new collection route? What is a query variable? When can you use a query variable?
Key takeaways
- Gatsby’s File System Route API lets you dynamically create new pages from data layer nodes by naming your files with a special syntax.
- File System Routes only work on files in the src/pages directory (or subdirectories).
- To create a new collection route, you name your file {nodeType.field}.js, where nodeType is the type of node you want to create pages from, and field is the data field from that node type that you want to use in the URL for that page.
- Query variables let you pass in different data values to the same GraphQL query. They can be combined with field arguments to get back data only about a specific node.
- Query variables can only be used in page queries.
------------------------------------------------------------------------
Last update on 04 Nov 2021
---