GatsbyJS - Query for Data with GraphQL
Information drawn from
So far, you’ve been writing text and adding images directly in your React components. That’s an excellent way to build many websites! But often it’s easier to create and maintain data somewhere else - like a folder of Markdown files or a content management system (CMS) - and then pull it into your components as needed. That way, you can make updates to your content without affecting the code for your site.
Conveniently, Gatsby has a powerful feature called the data layer that you can use to pull data into your site from anywhere. Want to keep your blog posts in WordPress, your store products in Shopify, and your user data in Airtable? No problem! With Gatsby’s data layer, you can combine data from multiple sources, which lets you choose the best platform for each type of data.
Gatsby’s data layer is powered by a technology called GraphQL. GraphQL is a query language with a special syntax that lets you ask for the data you need inside a component.
In this Tutorial, we’ll teach you all the GraphQL you’ll need to know to build your first Gatsby site. Interested in learning more? How To GraphQL is a free tutorial that teaches you the fundamentals.
In this part of the Tutorial, you’ll learn about how to add data to Gatsby’s data layer and how to pull that data into your React components.
By the end of this part of the Tutorial, you will be able to:
- Use GraphiQL to explore the data in the data layer and build your own GraphQL queries.
- Use the useStaticQuery hook to pull data into a “building-block” component.
- Use the gatsby-source-filesystem plugin to pull data into your site from your computer’s filesystem.
- Create a page query to pull data into a page component.
Meet Gatsby’s GraphQL data layer
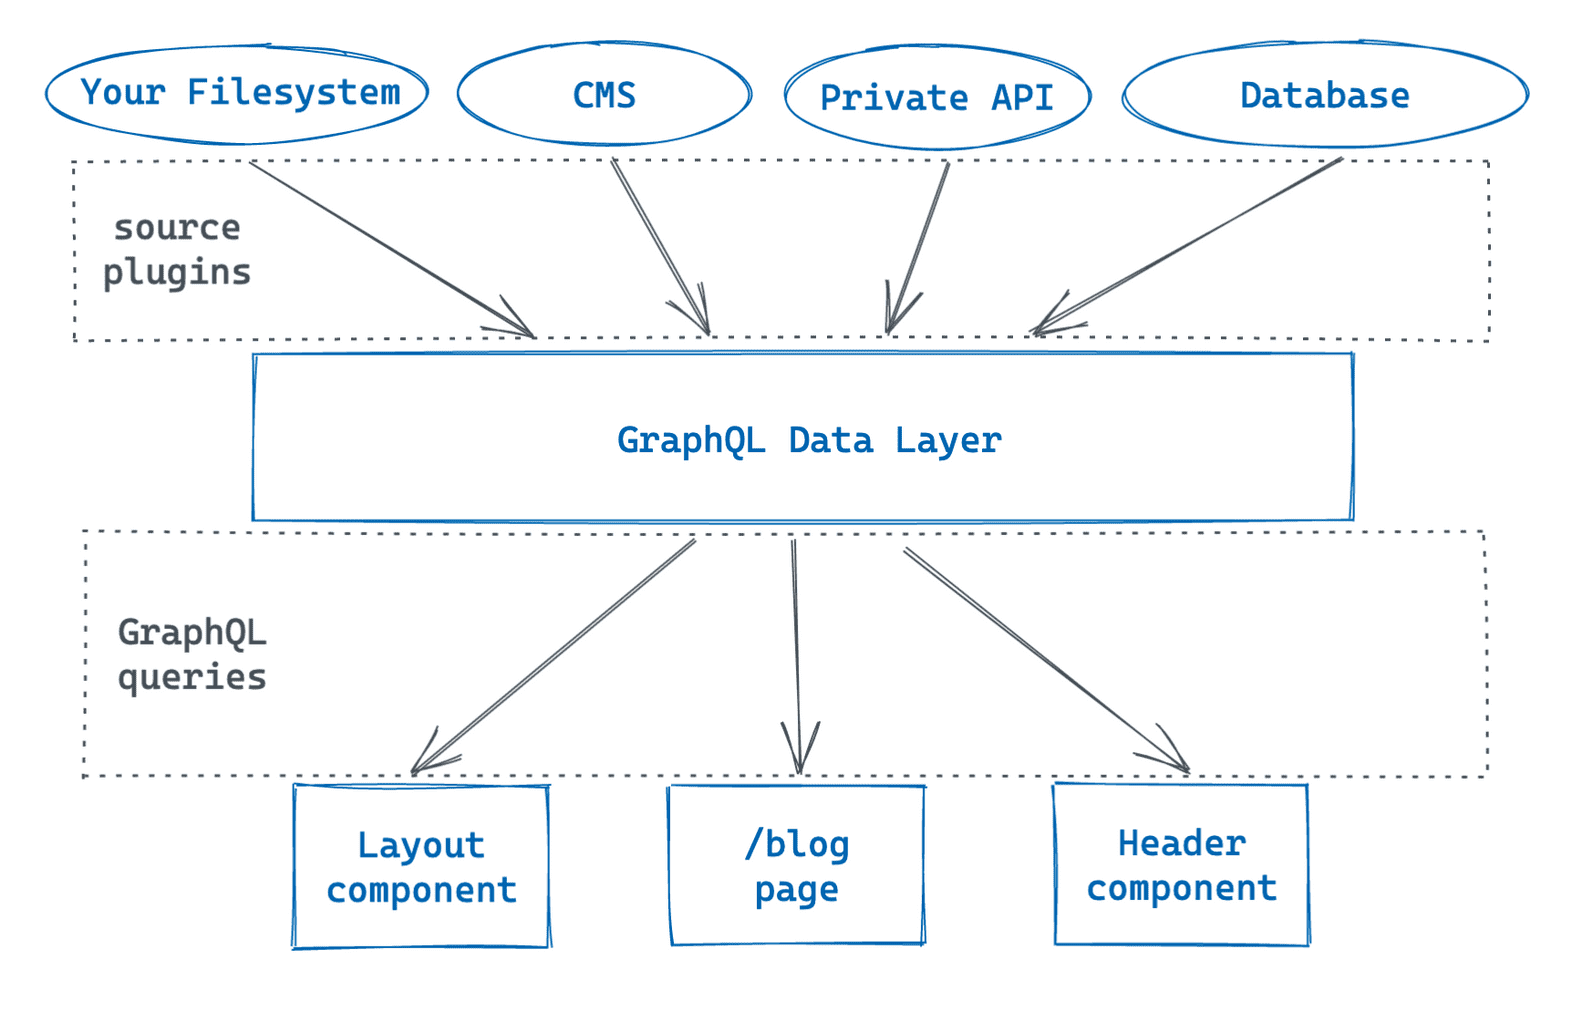
Gatsby has its own GraphQL data layer where it keeps all the data for your site. But how does it work under the hood?
First, your data is stored in one or more sources. That source might be a folder on your computer’s filesystem, a content management system (CMS) like WordPress, or a database. You might even have multiple data sources!
How do you get data from its source into the data layer? By adding a type of plugin to your site called a source plugin. Each source plugin is designed to communicate with a specific source. When you build your site, each source plugin pulls data from its particular source and adds it to your site’s GraphQL data layer.
Tip: Curious what source plugins are in the Plugin Library? You can identify source plugins by their name: they typically start with gatsby-source-.For example, a few popular source plugins are gatsby-source-filesystem and gatsby-source-contentful.
How do you get data back out of the data layer? You can write GraphQL queries inside of your components to pull out the data you want to use in your site. When you build your site, Gatsby will find all the GraphQL queries in your components, run them, and put the resulting data in your component.
Use GraphiQL to explore the data layer and write GraphQL queries
How do you know what data is in your site’s GraphQL data layer? When you start the local development server for your site, Gatsby automatically creates a special endpoint that lets you use an in-browser tool called GraphiQL. With GraphiQL, you can explore your site’s data and build GraphQL queries.
Follow the steps below to open the GraphiQL interface:
Start up your local development server by running gatsby develop. In a web browser, go to http://localhost:8000/___graphql. (That’s three underscores in the URL.)
### A closer look at the GraphiQL interface
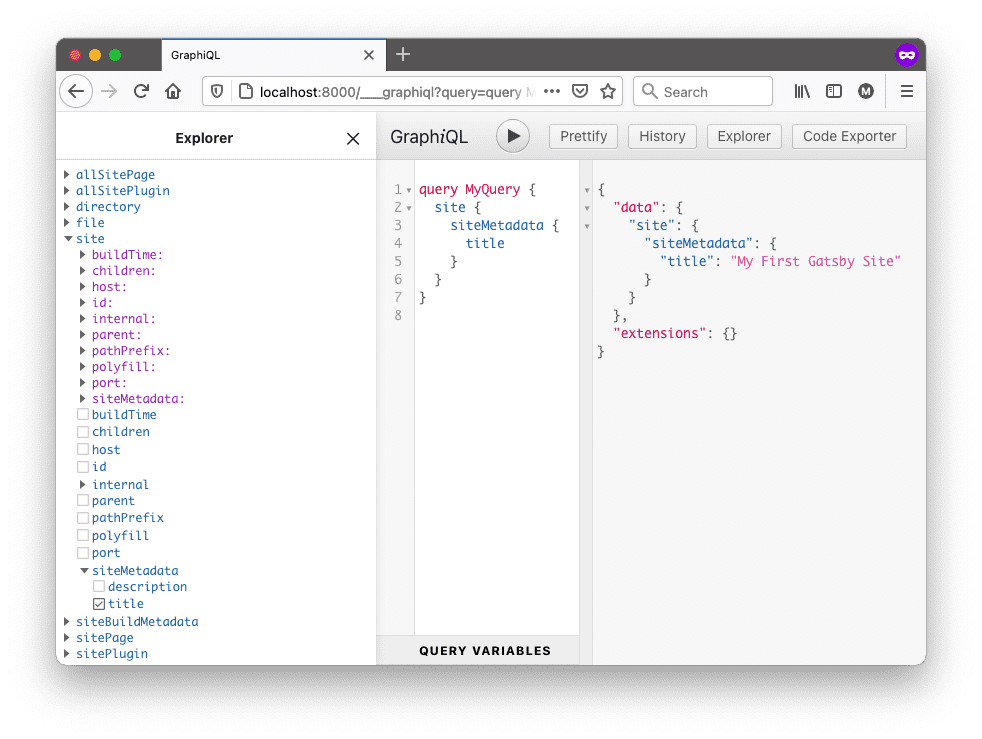
There are three main sections of the GraphiQL interface:
- Explorer: This is the section on the left, which shows you all the different kinds of data you can request in a GraphQL query.You can toggle the dropdowns to expand the different fields and see what kinds of data are available in the data layer. The blue items correspond to the different data fields you can query for. The purple items accept additional arguments that you can use to filter down the data returned in the response.
- Query Editor: This is the middle section, which you can use to write out a query to test. You can add fields to your query by checking the boxes for different fields in the Explorer pane. Or, if you’d prefer, you can type the fields directly into the Query Editor. (Pro Tip: You can press Ctrl + Space on your keyboard to bring up an autocompletion box that shows what fields are available to you.). To execute the query in the Query Editor, click the “Execute Query” button (it looks like a “play” triangle button) at the top of the page.
- Result Window: This is the section on the right, which shows you the result of running the query in the Query Editor.
GraphiQL is a helpful tool for testing out your GraphQL queries before you add them to your code. That way, you can make sure your queries always respond with the data you expect.
Try creating and running a few queries by doing the following:
-
Check a few of the blue fields in the Explorer pane. Note how checking the box for a field adds it to the query in the Query Editor.
-
Click the button at the top of the page (that looks like a “play” button) to execute the query. Look at the data returned in the Result window.
In the next section, you’ll learn more about how to use specific fields. For now, take a minute or two to explore the different fields. What kinds of data are already available to you in the data layer?
Queries in building-block components: Pull the site title into the Layout component
Now that you’ve seen the general process for how data works in your Gatsby site, it’s time to try it out yourself.
The process for using GraphQL queries in your components looks slightly different depending on whether it’s a page component or a building-block component.
In this first section, you’ll start by pulling data into a building-block component. To do that, you’ll update your Layout component to pull in the title of your site.
Task: Use GraphiQL to build the query
Look in your gatsby-config.js file. There’s already some information there about your site, in the siteMetadata object.
gatsby-config.js
module.exports = {
  siteMetadata: {
    title: "My First Gatsby Site",
  },
  plugins: [
    // ...
  ],
};
This data was added to your gatsby-config.js file automatically when you used the gatsby new command in Part 1. It also gets pulled into the GraphQL data layer automatically, so you don’t need a source plugin for this first section.
Since you don’t need to set up a source plugin, you can jump straight into GraphiQL to build your GraphQL query:
In your web browser, go to localhost:8000/___graphiql to see the GraphiQL interface. In the Explorer pane, open the dropdown for the site field. Within the site field, open the second dropdown for the siteMetadata field (the blue one). This corresponds to the siteMetadata object in your gatsby-config.js file.
– Seeing Double? –
You might have noticed that there are two different dropdowns for siteMetadata (and for every field under the site dropdown).
The first one (the purple one with a colon, siteMetadata:) is actually an argument attached to the site field. You can use the purple dropdowns to filter which pieces of data from the data layer get returned in the response. (You’ll see an example of this later on.)
The second one (the blue one without a colon, siteMetadata) is what you’ll use more frequently. This one adds the actual siteMetadata field to your query, which tells GraphQL to include that field in your response data.
Try toggling each of the dropdowns in the Explorer and see how the query in the Query Editor pane changes. What differences do you notice? –.–
Within siteMetadata, check the box next to the title field. The query in your query editor should look like this:
query MyQuery {
  site {
    siteMetadata {
      title
    }
  }
}
Click the Execute Query button (the “play” triangle at the top of the page) to run the query. The response in the Result Window should look something like the object below. Notice how the structure of the data object in the response matches the structure of the fields in the query.
{
  "data": {
    "site": {
      "siteMetadata": {
        "title": "My First Gatsby Site"
      }
    }
  },
  "extensions": {}
}
Try changing the value of the title property in your gatsby-config.js file. When you save the file, your site should rebuild, and when it’s finished you can re-run the query in GraphiQL and see your updated data.
Task: Use useStaticQuery to pull the site title into the Layout component
Now that you have a GraphQL query that returns the data you’re looking for, how do you use that query in your React components?
To pull data into a building-block component, you’ll use a pre-defined function from Gatsby called useStaticQuery.
– Key Gatsby Concept – : Pulling data into building-block components with useStaticQuery The Gatsby package has a special pre-defined hook that lets you add GraphQL queries to your building-block components: useStaticQuery.
useStaticQuery takes one parameter: a templated string of the GraphQL query you want to run. It returns the requested data, which you can store in a variable and then use throughout your component.
Here’s a brief outline of the process for adding useStaticQuery to pull data into your building-block components:
- Import the useStaticQuery hook and the graphql tag from the gatsby package. The graphql tag is something called a tagged template literal. Basically, the graphql tag tells Gatsby that the string following it is a GraphQL query, so then Gatsby can parse and run it.
import { useStaticQuery, graphql } from 'gatsby'
Inside your component, call useStaticQuery using the graphql template tag and your query from GraphiQL. Store the results in a new variable so that you can use it later in your component.
const data = useStaticQuery(graphql`
  // Copy-paste your query from GraphiQL here, and delete the query name "MyQuery"
`)
Use the data in your component by using the dot operator (.) to access the appropriate field off the response. Here’s a small example to show what this process looks like in practice:
src/components/header.js
import * as React from 'react'
// Step 1: Import the useStaticQuery hook and graphql tag
import { useStaticQuery, graphql } from 'gatsby'
const Header = () => {
  /* Step 2: Use the useStaticQuery hook and
    graphql tag to query for data
    (The query gets run at build time) */
  const data = useStaticQuery(graphql`
    query {
      site {
        siteMetadata {
          title
        }
      }
    }
  `)
  return (
    <header>
      {/* Step 3: Use the data in your component */}
      <h1>{ data.site.siteMetadata.title }</h1>
    </header>
  )
}
export default Header
Note: You can only call useStaticQuery once per file. If you need multiple fields, you can add them all into a single query.For example, if you need data from both the site field and the siteBuildMetadata field, you could make the following call to useStaticQuery:
const data = useStaticQuery(graphql`
  query {
    site {
      siteMetadata {
        title
      }
    }
    siteBuildMetadata {
      buildTime
    }
  }
`)
- –.– *
Follow the steps below to use useStaticQuery to pull in the site title from your site metadata into your Layout component.
Import the useStaticQuery function and the graphql tag from the Gatsby package. src/components/layout.js
import * as React from 'react'
import { Link, useStaticQuery, graphql } from 'gatsby'
import {
  container,
  heading,
  navLinks,
  navLinkItem,
  navLinkText
} from './layout.module.css'
const Layout = ({ pageTitle, children }) => {
  return (
    // ...
  )
}
export default Layout
Call useStaticQuery and pass it the query you created in GraphiQL. Be sure to use the graphql tag so Gatsby knows that the string you’re passing in is a GraphQL query. Store the return value from useStaticQuery in a variable.
Note: By default, the query you build in GraphiQL will have a query name, like MyQuery. You may see an error if you have more than one query with the same name, so after you copy your query over from GraphiQL to your component, delete the name (as in the code example below).
src/components/layout.js
import * as React from 'react'
import { Link, useStaticQuery, graphql } from 'gatsby'
import {
  container,
  heading,
  navLinks,
  navLinkItem,
  navLinkText
} from './layout.module.css'
const Layout = ({ pageTitle, children }) => {
  const data = useStaticQuery(graphql`
    query {
      site {
        siteMetadata {
          title
        }
      }
    }
  `)
  return (
    // ...
  )
}
export default Layout
Note: If you add a line to print out the value of your data variable to the console, you’ll see that the response has a slightly different structure from what it looked like in GraphiQL’s Result Window. Specifically, your data variable will only contain the object that matches the data field in the Result Window.
So if your GraphiQL Result Window showed this:
{
  "data": {
    "site": {
      "siteMetadata": {
        "title": "My First Gatsby Site"
      }
    }
  },
  "extensions": {}
}
then your data variable will have the following structure:
{
  "site": {
    "siteMetadata": {
      "title": "My First Gatsby Site"
    }
  }
}
Now that you have a variable with the results of your query, you can render the title of your site in the JSX for your Layout component. To access the site title, use the JavaScript dot operator (.) to get the value of data.site.siteMetadata.title. Add it so it appears in both the browser tab and at the top of your page content.
src/components/layout.js
import * as React from 'react'
import { Link, useStaticQuery, graphql } from 'gatsby'
import {
  container,
  heading,
  navLinks,
  navLinkItem,
  navLinkText
} from './layout.module.css'
const Layout = ({ pageTitle, children }) => {
  const data = useStaticQuery(graphql`
    query {
      site {
        siteMetadata {
          title
        }
      }
    }
  `)
  return (
    <div className={container}>
      <title>{pageTitle} | {data.site.siteMetadata.title}</title>
      <header>{data.site.siteMetadata.title}</header>
      <nav>
        <ul className={navLinks}>
          <li className={navLinkItem}>
            <Link to="/" className={navLinkText}>
              Home
            </Link>
          </li>
          <li className={navLinkItem}>
            <Link to="/about" className={navLinkText}>
              About
            </Link>
          </li>
        </ul>
      </nav>
      <main>
        <h1 className={heading}>{pageTitle}</h1>
        {children}
      </main>
    </div>
  )
}
export default Layout
Now that the site title is showing up on the page, it’s time to add some style! Define some styles for the site title below the existing styles in your layout.module.css file. src/components/layout.module.css
/* ... your existing styles */
.site-title {
  font-size: 3rem;
  color: gray;
  font-weight: 700;
  margin: 3rem 0;
}
Import your new styles into your Layout component and apply them to the site title paragraph you added. src/components/layout.js
import * as React from 'react'
import { Link, useStaticQuery, graphql } from 'gatsby'
import {
  container,
  heading,
  navLinks,
  navLinkItem,
  navLinkText,
  siteTitle,
} from './layout.module.css'
const Layout = ({ pageTitle, children }) => {
  const data = useStaticQuery(graphql`
    query {
      site {
        siteMetadata {
          title
        }
      }
    }
  `)
  return (
    <div className={container}>
      <title>{pageTitle} | {data.site.siteMetadata.title}</title>
      <header className={siteTitle}>{data.site.siteMetadata.title}</header>
      <nav>
        <ul className={navLinks}>
          <li className={navLinkItem}>
            <Link to="/" className={navLinkText}>
              Home
            </Link>
          </li>
          <li className={navLinkItem}>
            <Link to="/about" className={navLinkText}>
              About
            </Link>
          </li>
        </ul>
      </nav>
      <main>
        <h1 className={heading}>{pageTitle}</h1>
        {children}
      </main>
    </div>
  )
}
export default Layout
Congratulations, you’ve just used GraphQL to pull data into your site! Try changing the site title in your gatsby-config.js file and see your site update in the browser.
Queries in page components: Create a blog page with a list of post filenames
So far, your site has a few static landing pages: the Home page and the About page. The next step is to build out the actual blog page!
Eventually, your blog page will link to separate pages for each of your posts. But there’s a lot to learn to achieve that, so you’ll be working up to that goal over the next few parts of the Tutorial (Parts 4, 5, and 6).
In this part, you’ll create a blog page that lists the filenames for your posts.
Task: Create a new blog page
Start by setting up the skeleton for your new blog page component.
Create a new file: src/pages/blog.js. Define and export a new page component for your blog page. Use your existing Layout component to add some basic structure.
src/pages/blog.js
import * as React from 'react'
import Layout from '../components/layout'
const BlogPage = () => {
  return (
    <Layout pageTitle="My Blog Posts">
      <p>My cool posts will go in here</p>
    </Layout>
  )
}
export default BlogPage
Add a link to your new blog page to the navigation bar in your Layout component: src/components/layout.js
// ... import statements
const Layout = ({ pageTitle, children }) => {
  const data = useStaticQuery(graphql`
    query {
      site {
        siteMetadata {
          title
        }
      }
    }
  `)
  return (
    <div className={container}>
      <title>{pageTitle} | {data.site.siteMetadata.title}</title>
      <header className={siteTitle}>{data.site.siteMetadata.title}</header>
      <nav>
        <ul className={navLinks}>
          <li className={navLinkItem}>
            <Link to="/" className={navLinkText}>
              Home
            </Link>
          </li>
          <li className={navLinkItem}>
            <Link to="/about" className={navLinkText}>
              About
            </Link>
          </li>
          <li className={navLinkItem}>
            <Link to="/blog" className={navLinkText}>
              Blog
            </Link>
          </li>
        </ul>
      </nav>
      <main>
        <h1 className={heading}>{pageTitle}</h1>
        {children}
      </main>
    </div>
  )
}
export default Layout
Now, if you go to localhost:8000/blog in your web browser, you should see your new blog page skeleton, and there should be a link to the blog page in your navigation bar.
Task: Create some MDX blog posts
Now that you have a blog page, it’s time to create some blog posts! For your site, you’ll store each blog post as a separate file inside of a folder in your project.
Create a new directory called blog at the top level of your project folder.
Create three new files in the blog directory: one for each post. It doesn’t matter what you name them, as long as they end with the .mdx extension. (You’ll learn more about the powers of MDX in Part 5.) You can leave the files empty for now.
Task: Use GraphiQL to build the query
Now that you have some posts saved to your local filesystem, it’s time to pull those files into the Gatsby data layer. To do that, you’ll use a plugin called gatsby-source-filesystem.
Note: Remember the process for adding a plugin to your site from Part 3? The first step was to install the plugin.
If you’ve been following along from the beginning, you should already have installed gatsby-source-filesystem in Part 3 (because you needed it for adding static images with gatsby-plugin-image).
Otherwise, you can install the plugin by running the following command from the command line:
npm install gatsby-source-filesystem
Configure gatsby-source-filesystem in your gatsby-config.js file. Since gatsby-source-filesystem requires some additional configuration options, you’ll use a configuration object instead of a string. The code example below shows how to “source” files from your blog directory (in other words, how to add them to the data layer). gatsby-config.js
module.exports = {
  siteMetadata: {
    title: "My First Gatsby Site",
  },
  plugins: [
    "gatsby-plugin-image",
    "gatsby-plugin-sharp",
    {
      resolve: "gatsby-source-filesystem",
      options: {
        name: `blog`,
        path: `${__dirname}/blog`,
      }
    },
  ],
};
A closer look at the configuration options:
When your site builds, gatsby-source-filesystem adds all the files in the folder specified by the path option to the data layer.
-
__dirname: is a variable from Node.js that stores the absolute path for the directory that contains the file currently being run.)
-
The name option in the configuration object gets set to the sourceInstanceName field for each file. This comes in handy when you want to source files from multiple folders. By giving each folder a different name option, you can build GraphQL queries that filter down to only a particular folder.
Restart your local development server to make sure it picks up the configuration changes and adds your files to the data layer.
You can use the allFile field to request data about multiple files at once. In GraphiQL, try exploring the different fields within allFile to see what sorts of data you get back. Then build a query using the allFile field to get the name of all the files in your blog folder:
query MyQuery {
  allFile {
    nodes {
      name
    }
  }
}
Run the query in GraphiQL. Your response in the Result Window should look something like the object below:
{
  "data": {
    "allFile": {
      "nodes": [
        {
          "name": "my-first-post"
        },
        {
          "name": "another-post"
        },
        {
          "name": "yet-another-post"
        }
      ]
    }
  },
  "extensions": {}
}
– Seeing more nodes than expected? – If you’re still using a StaticImage from an external URL (like https://some-site/image.jpg) on your home page, you’ll see an extra node for that image show up in your GraphQL response. That’s because StaticImage uses createRemoteFileNode under the hood which creates a File node for each image it downloads. If you’re only using images from your filesystem, you won’t see the extra node.
To get rid of it, you can update your GraphQL query to filter the File nodes using the sourceInstanceName field (which corresponds to the value of the name option you set for gatsby-source-filesystem in your gatsby-config.js file).
src/pages/blog.js
query {
  allFile(filter: {sourceInstanceName: {eq: "blog"}}) {
    nodes {
      name
    }
  }
}
filter is an argument that gets passed into the allFile field. Some fields take arguments, which you can use to change the way that nodes get returned in your final GraphQL response.
Task: Use a page query to pull the list of post filenames into your blog page
Now that you’ve built a GraphQL query that returns a list of your post filenames, it’s time to render that data in your blog page!
Using GraphQL queries in page components uses a slightly different syntax from queries in building-block components. In page components, you use page queries.
– Key Gatsby Concept – : Pulling data into page components with page queries The process for making a query in a page component looks slightly different from useStaticQuery:
- Import the graphql tag from the Gatsby package.
- Export a variable that stores a templated string with the GraphQL query you want to run. When your site gets built, Gatsby will run your page query and pass the resulting data into your page component as a prop called data. Your page query needs to be defined outside of your page component. (With useStaticQuery, your query was defined inside your component.)
- Use the data prop in your page component, as needed. You can use the JavaScript dot operator (.) to choose fields off of the data prop.
Here’s a small example to show what this process looks like in practice:
import * as React from 'react'
// Step 1: Import the graphql tag
import { graphql } from 'gatsby'
const HomePage = ({ data }) => {
  return (
    <p>
      { /* Step 3: Use the data in your component*/ }
      { data.site.siteMetadata.description }
    </p>
  )
}
// Step 2: Export a page query
export const query = graphql`
  query {
    site {
      siteMetadata {
        description
      }
    }
  }
`
export default HomePage
–.–
Follow the steps below to add a list of post filenames to your blog page.
Import the graphql tag from the Gatsby package. src/pages/blog.js
import * as React from 'react'
import { graphql } from 'gatsby'
import Layout from '../components/layout'
const BlogPage = () => {
  return (
    <Layout pageTitle="My Blog Posts">
      <p>My cool posts will go in here</p>
    </Layout>
  )
}
export default BlogPage
Define and export your page query. Copy over the query you built in GraphiQL. Note: By default, the query you build in GraphiQL will have a query name, like MyQuery. You may see an error if you have more than one query with the same name, so after you copy your query over from GraphiQL to your component, delete the name (as in the code example below).
Alternatively, you can give each of your queries a unique name. Query names can be useful for debugging errors that show up in your console when Gatsby executes your queries at build time.
src/pages/blog.js
import * as React from 'react'
import { graphql } from 'gatsby'
import Layout from '../components/layout'
const BlogPage = () => {
  return (
    <Layout pageTitle="My Blog Posts">
      <p>My cool posts will go in here</p>
    </Layout>
  )
}
export const query = graphql`
  query {
    allFile {
      nodes {
        name
      }
    }
  }
`
export default BlogPage
Add in the data prop to the function definition. Then replace the placeholder <p> element with a list of the filenames for your posts. Use the JavaScript array .map() method to iterate over the nodes array and render the filename for each post.
.map() takes in a function, which it runs on each element in the array. In the code block below, you’re using .map() to loop over each of the nodes in data.allFile.nodes and return a React element that wraps the node’s name in an <li> element.
In React, when you use the .map() method to render a list of elements, you should give each element in the list a unique key prop. This helps React keep track of what values have changed and need to be rerendered. For more on rendering lists in React, check out the React Docs: Lists and Keys.
src/pages/blog.js
import * as React from 'react'
import { graphql } from 'gatsby'
import Layout from '../components/layout'
const BlogPage = ({ data }) => {
  return (
    <Layout pageTitle="My Blog Posts">
      <ul>
      {
        data.allFile.nodes.map(node => (
          <li key={node.name}>
            {node.name}
          </li>
        ))
      }
      </ul>
    </Layout>
  )
}
export const query = graphql`
  query {
    allFile(filter: {sourceInstanceName: {eq: "blog"}}) {
      nodes {
        name
      }
    }
  }
`
export default BlogPage
Good job! You’ve finished the first step of your new blog page.
You won’t be able to render the contents of your posts just yet, since your site doesn’t know how to process MDX. You’ll fix that in the next part of the Tutorial!
Summary
Take a moment to think back on what you’ve learned so far. Challenge yourself to answer the following questions from memory:
- How do you get data into the data layer?
- How can you see what data is in the data layer?
- How do you get data out of the data layer?
- What are the differences between a page query and useStaticQuery? How would you decide which one to use?
Key takeaways
- Source plugins pull data from their original location into the Gatsby GraphQL data layer.
- You can use the GraphiQL endpoint (localhost:8000/___graphql) to explore the data in the data layer and design GraphQL queries.
- You can write GraphQL queries to pull data out of the data layer and into your React components.
- To pull data into a “building block” component, use the useStaticQuery hook.
- To pull data into a page component, use a page query.
– Key Gatsby Concept – : General process for using data in your site
- Add a source plugin to add data into the GraphQL data layer.
- Use GraphiQL to design a query that responds with the data you want from the data layer.
- Add the query into your component.
- Use page queries for page components.
- Use useStaticQuery for “building block” components.
- Use the data from the response in your component. –.–
------------------------------------------------------------------------
Last update on 03 Nov 2021
---