GatsbyJS - Transform Data to Use MDX
Information drawn from
In Part 4, you used the gatsby-source-filesystem source plugin to build a Blog page that lists the names of your blog post files. But you weren’t able to actually render the contents of your post files, because gatsby-source-filesystem doesn’t provide a field for it. To do that,you’ll need another type of plugin called a transformer plugin.
Sometimes, the format of the data you get from source plugins isn’t exactly what you want to use to build your website. For example, the filesystem source plugin lets you query data about files, but it doesn’t let you use the data inside the files themselves. To make this possible, Gatsby supports transformer plugins, which take the raw content from source plugins and transform it into something more usable.
In this part of the Tutorial, you’ll learn about one particular transformer plugin, gatsby-plugin-mdx, which lets you use MDX, a file format that allows Markdown and JSX alongside your text content. (Fun fact: this Tutorial is actually written in MDX!) You’ll use MDX to add some content to your blog post files, and then you’ll use gatsby-plugin-mdx to render the contents of your posts on your Blog page.
Note: Usually, transformer plugin names start with gatsby-transformer-. (gatsby-plugin-mdx is one exception to this convention.) To see a list of other transformer plugins, try searching for gatsby-transformer- in the Gatsby Plugin Library.
By the end of this part of the Tutorial, you will be able to:
- Write an MDX file with Markdown formatting and frontmatter.
- Use the gatsby-plugin-mdx plugin to render the contents of your MDX files on your Blog page.
- Use the sort field to control the order of results in your GraphQL queries.
## A closer look at Gatsby’s GraphQL data layer
To understand how gatsby-plugin-mdx and other transformer plugins work, you need to know a bit more about how Gatsby’s GraphQL data layer works.
Inside the data layer, information is stored in objects called nodes. A node is the smallest form unit of data in the data layer. Different source plugins create different types of nodes, each of which have their own properties. For example, gatsby-source-filesystem creates File nodes.
A transformer plugin converts nodes from one type to another. For example, the gatsby-plugin-mdx plugin transforms File nodes that have the .mdx extension into MDX nodes, which have a different set of fields that you can query using GraphQL. Transformer plugins let you manipulate the raw data in the nodes created by source plugins, so that you can get it into the structure or format you need.
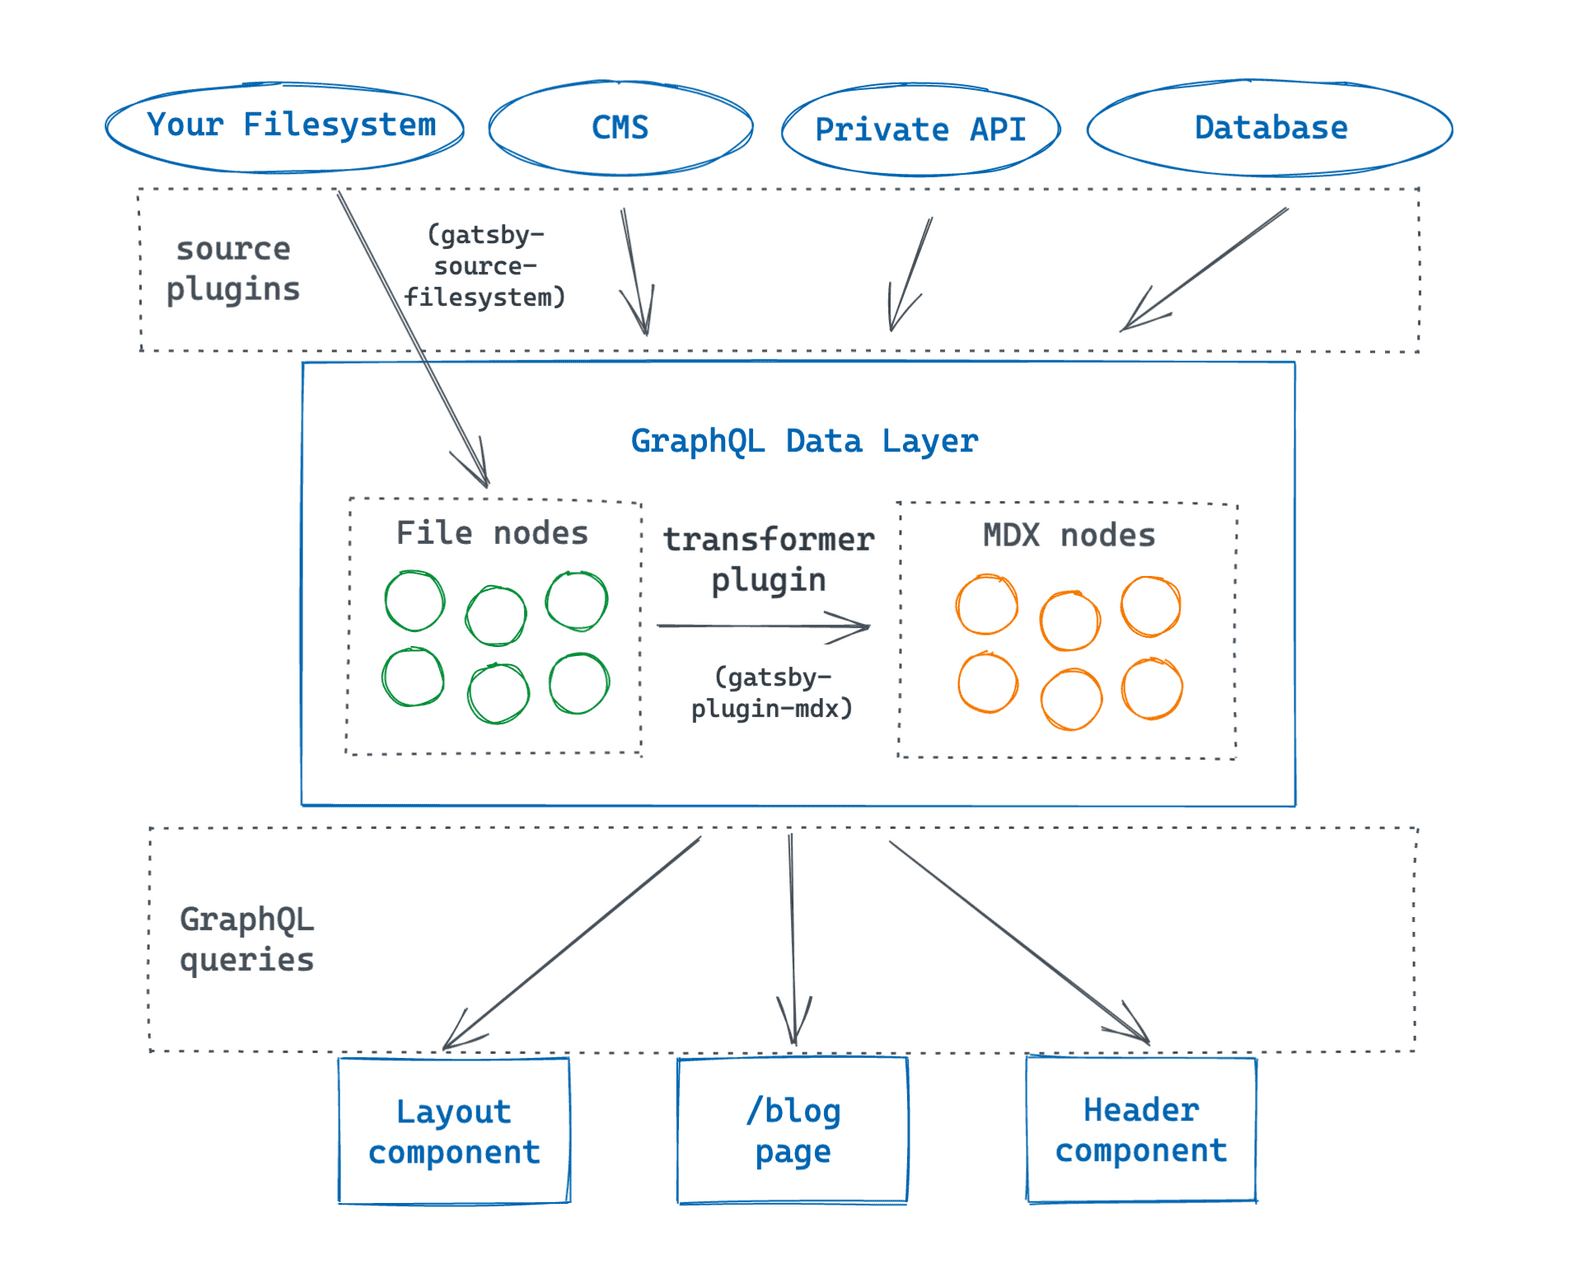
Note: Even though it’s called a transformer plugin, it’s not actually changing the original nodes created by the source plugins. Each transformer plugin creates new nodes based on the data from the sourced nodes, but it doesn’t actually change the source nodes themselves. So even though gatsby-plugin-mdx creates new MDX nodes in the data layer, you can still access the original File nodes created by gatsby-source-filesystem.
## Add some MDX content to your blog posts
In Part 4, you created empty files for your blog posts. Now, it’s time to fill them in!
– Using Markdown formatting in MDX – MDX files let you format text using Markdown, a markup language that uses a special syntax to add special formatting to your text elements. For example, you can make text appear strong by wrapping it in double asterisks, or you can create a link by using a syntax like text to link. Once you get used to what all the different symbols mean, Markdown can be easier to read than HTML, which makes it a popular format for written content like blog posts. New to Markdown? The MDX documentation includes a table of components that shows the different formatting options available. It includes things like headings, blockquotes, lists, and code blocks. Frontmatter With gatsby-plugin-mdx, you can also add frontmatter to your MDX files. Frontmatter is additional metadata about your file. It won’t be rendered on your page, but it’s a way for you to add some extra details about your content. For example, you might store your post title or the date it was published. To add frontmatter to your post, put it between an opening and closing set of three hyphens (—) at the top of your MDX file. Within the opening and closing hyphens, you can create key-value pairs for any kind of data you want to store about your file. Here’s an example:
---
name: "Fun Facts about Red Pandas"
datePublished: "2021-07-12"
author: "#1 Red Panda Fan"
---
Add some Markdown content to each of the .mdx files you created in your /blog directory in Part 4. Include frontmatter with fields for the title of each post and the date it was published. (Give each post a different date, to make it easier to add sorting later on.) After the frontmatter, write some post content using some Markdown syntax.
Here are some example posts that you can use for inspiration:
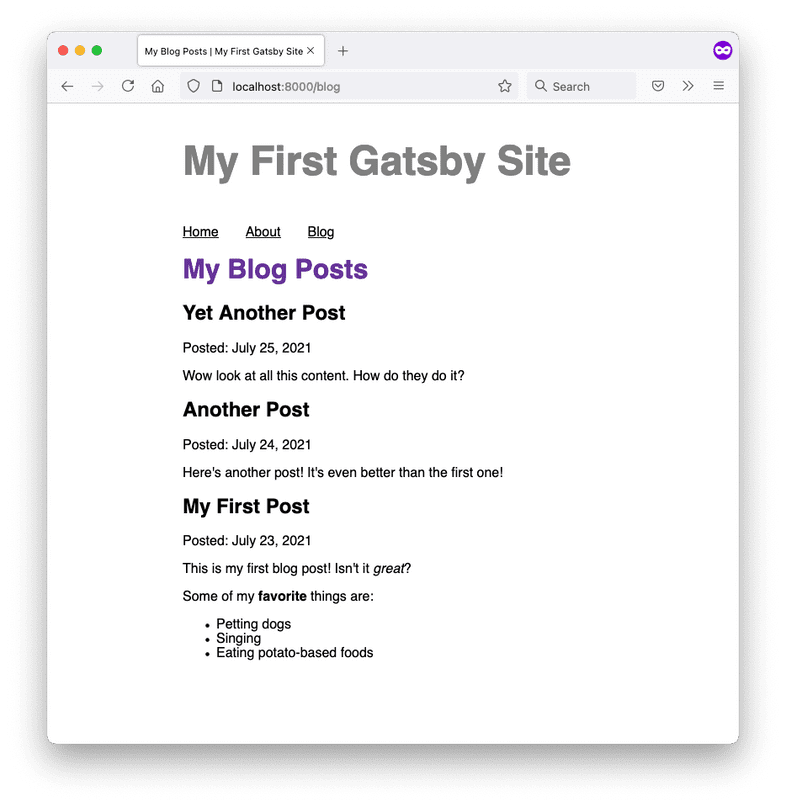
blog/my-first-post.mdx
---
title: "My First Post"
date: "2021-07-23"
---
This is my first blog post! Isn't it *great*?
Some of my **favorite** things are:
* Petting dogs
* Singing
* Eating potato-based foods
blog/another-post.mdx
---
title: "Another Post"
date: "2021-07-24"
---
Here's another post! It's even better than the first one!
blog/yet-another-post.mdx
---
title: "Yet Another Post"
date: "2021-07-25"
---
Wow look at all this content. How do they do it?
### Render each post’s contents on the Blog page Now that you have some MDX content inside your blog posts, it’s time set up the gatsby-plugin-mdx transformer plugin.
Quick Refresher: Remember the process for adding a plugin to your site (from Part 3)? See if you can remember the three steps from memory before checking your answer. (Science has shown that the act of trying to actively recall information helps you retain it better!)
The gatsby-plugin-mdx plugin provides some new tools for you to use in your site:
- The allMdx and mdx fields (for your GraphQL queries)
- An MDXRenderer component (for processing and displaying MDX content)
To render your posts on the Blog page, you’ll complete a few different steps:
- Install and configure the gatsby-plugin-mdx transformer plugin and its dependencies.
- Update the Blog page query to use the allMdx field from gatsby-plugin-mdx instead of allFile.
- Use the MDXRenderer component from gatsby-plugin-mdx to render your post’s MDX contents in the JSX for your Blog page.
Task: Install and configure the MDX transformer plugin (and dependencies)
The gatsby-plugin-mdx package requires a few additional dependencies to run: @mdx-js/mdx (which implements MDX) and @mdx-js/react (which maps the MDX implementation to React components).
In your terminal, run the command below to install gatsby-plugin-mdx and its dependencies. (This adds all three packages to the dependencies object in your package.json file and to your node_modules directory.)
npm install gatsby-plugin-mdx @mdx-js/mdx @mdx-js/react
Add gatsby-plugin-mdx to the plugins array in your gatsby-config.js file, so that Gatsby knows to use the plugin when building your site.
gatsby-config.js
module.exports = {
  siteMetadata: {
    title: "My Super Cool Blog",
  },
  plugins: [
    "gatsby-plugin-image",
    "gatsby-plugin-sharp",
    {
      resolve: `gatsby-source-filesystem`,
      options: {
        name: `blog`,
        path: `${__dirname}/blog/`,
      },
    },
    "gatsby-plugin-mdx",
  ],
};
Tip: There are a variety of remark plugins that you can use to add extra features to your Markdown. You can configure them using the gatsbyRemarkPlugins option when you configure gatsby-plugin-mdx in your gatsby-config.js file. Here are some popular remark plugins: 1.- gatsby-remark-images: Use this if you want to generate responsive images when using the Markdown image syntax (which looks like this:
). To use this plugin, you’ll also need gatsby-plugin-sharp, which you installed already in Part 3. 2.- gatsby-remark-prismjs: Add syntax highlighting to your code blocks. 3.- gatsby-remark-autolink-headers: Automatically create links for all the headers in your Markdown content. Try searching for gatsby-remark- in the Gatsby Plugin Library for a full list.
Task: Update the Blog page query to use the allMdx field instead of allFile
The gatsby-plugin-mdx plugin makes two new fields available for you to use in your GraphQL queries: allMdx and mdx. In this part of the Tutorial, you’ll use allMdx to add the contents of each blog post to your Blog page. (You’ll use the mdx field later on, in Part 6.)
You can use the allMdx field to request data for multiple MDX nodes at once (similar to the way allFile worked with File nodes). Open GraphiQL and explore what fields are available on MDX nodes. Try running a few queries to see what kind of information you get back.
Quick Refresher: Remember how to access GraphiQL? See if you can remember the steps before checking for the answer in Part 4. (Check the section called “Use GraphiQL to explore the data layer and write GraphQL queries”).
Use GraphiQL to create a new query that gets data about your blog posts using the allMdx field instead of the allFile field.
Under allMdx, open the nodes dropdown. Inside the frontmatter dropdown, you should see fields for all the keys you created in the frontmatter of your MDX files. Select the title and date fields. You can use the formatString argument on the date field to change the way your dates are displayed (see Syntax Hint below).
query MyQuery {
  allMdx {
    nodes {
      frontmatter {
        date(formatString: "MMMM D, YYYY")
        title
      }
    }
  }
}
Syntax Hint: When it comes to using dates in your frontmatter, the formatString argument is a helpful tool for changing the way the date is displayed. Imagine you have a key in your frontmatter with a value that uses a date format like “YYYY-MM-DD”. (It doesn’t matter what you name the key, as long as the value has the required format.) GraphiQL will automatically detect that your value is a date, and when you select the corresponding frontmatter field in the Explorer pane, GraphiQL will automatically show a few arguments that you can pass to that field. One of those arguments is called formatString, which you can pass a Moment.js formatting token to change the way the date displays. For example, if your MDX frontmatter looks like this:
---
date: "2021-07-23"
---
…and your GraphQL query looks like this:
query MyQuery {
  allMdx {
    nodes {
      frontmatter {
        date(formatString: "MMMM D, YYYY")
      }
    }
  }
}
…then the dates in your response will look like this: “July 23, 2021”.
While you’re at it, add the id field, which is a unique string that Gatsby automatically adds to every node in the data layer. (You’ll use this as a React key later on, when you iterate over your list of posts.)
query MyQuery {
  allMdx {
    nodes {
      frontmatter {
        date(formatString: "MMMM D, YYYY")
        title
      }
      id
    }
  }
}
Execute your query by clicking the triangle button. Your response object should look something like this:
{
  "data": {
    "allMdx": {
      "nodes": [
        {
          "frontmatter": {
            "date": "July 25, 2021",
            "title": "Yet Another Post"
          },
          "id": "c4b5ae6d-f3ad-5ea4-ab54-b08a72badea1"
        },
        {
          "frontmatter": {
            "date": "July 23, 2021",
            "title": "My First Post"
          },
          "id": "11b3a825-30c5-551d-a713-dd748e7d554a"
        },
        {
          "frontmatter": {
            "date": "July 24, 2021",
            "title": "Another Post"
          },
          "id": "560896e4-0148-59b8-9a2b-bf79bee68fba"
        }
      ]
    }
  },
  "extensions": {}
}
You might notice that your posts aren’t listed in order. Most blog sites list their posts in reverse-chronological order, so that the newest posts are listed first. You can sort the data nodes in your response by using the sort argument on the allMdx field.
- In the Explorer pane, toggle the **sort dropdown underneath the allMdx **field.
- Under sort, check the fields argument, and use the dropdown to select which field you want to sort your data nodes by. In this case, that would be frontmatter___date (with three underscores).
- Check the order argument, and use the dropdown to select DESC. This will sort the nodes in descending order, so that the newest posts come first.
query MyQuery {
allMdx(sort: {fields: frontmatter___date, order: DESC}) {
  nodes {
    frontmatter {
      date(formatString: "MMMM D, YYYY")
      title
    }
    id
  }
}
}
Run your query again to verify that the posts come back in the correct order. Your response should look something like this:
{
  "data": {
    "allMdx": {
      "nodes": [
        {
          "frontmatter": {
            "date": "July 25, 2021",
            "title": "Yet Another Post"
          },
          "id": "c4b5ae6d-f3ad-5ea4-ab54-b08a72badea1"
        },
        {
          "frontmatter": {
            "date": "July 24, 2021",
            "title": "Another Post"
          },
          "id": "560896e4-0148-59b8-9a2b-bf79bee68fba"
        },
        {
          "frontmatter": {
            "date": "July 23, 2021",
            "title": "My First Post"
          },
          "id": "11b3a825-30c5-551d-a713-dd748e7d554a"
        }
      ]
    }
  },
  "extensions": {}
}
The last thing you need to add to your query is the contents of each post! To do that, add the body field to your query.
query MyQuery {
  allMdx(sort: {fields: frontmatter___date, order: DESC}) {
    nodes {
      frontmatter {
        date(formatString: "MMMM D, YYYY")
        title
      }
      id
      body
    }
  }
}
When you run your query, the body field for each node should look something like the data shown below. That’s a lot of information! The body field actually contains the compiled MDX content for your file. It might not be readable for humans, but it’s the format that the MDXRenderer component understands. (You’ll get to MDXRenderer in a moment.)
Now that you have your GraphQL query all set up, it’s time to tackle the last piece of the puzzle: rendering your posts in the Blog page.
Pro Tip: When transformer plugins create a new node, they add a parent field that references back to the original source node it was created from. For example, when gatsby-plugin-mdx creates new MDX nodes, it adds a parent field which you can use to access data from the original File node. Using the parent node can come in handy if you want to use data from the transformed nodes along with data from the original source nodes. For example, the query below gives you back the time a file was changed, which you could use to display when a post was last updated. query MyQuery { allMdx { nodes { parent { … on File { modifiedTime(formatString: “MMMM D, YYYY”) } } } } }
#### Task: Use the MDXRenderer component to render your post’s contents in your Blog page Now that your GraphQL query is all set up, it’s time to replace the page query in your Blog page component.
Start by swapping out the allFile page query in your Blog page for the one you just created using allMdx. (Don’t forget to delete the query name!) And if you haven’t already from completing the task in Part 4, you’ll need to import the graphql tag from the gatsby package.
src/pages/blog.js
import * as React from 'react'
import { graphql } from 'gatsby'
import Layout from '../components/layout'
const BlogPage = ({ data }) => {
  return (
    // ...
  )
}
export const query = graphql`
  query {
    allMdx(sort: {fields: frontmatter___date, order: DESC}) {
      nodes {
        frontmatter {
          date(formatString: "MMMM D, YYYY")
          title
        }
        id
        body
      }
    }
  }
`
export default BlogPage
Next, update the JSX for your Blog page to use the data fields of your response. Start by rendering just the title and date for each post.
Now that you’re rendering more than just a filename, it makes more sense to use the <article> semantic HTML element instead of a <ul> and nested <li> elements.
You can also use the id field as your unique key prop for each post. (React uses the key prop to keep track of what elements need to be re-rendered. If you don’t include it, you’ll get a warning in your browser console. For more on the key prop, check out the React Docs: List and Keys.)
src/pages/blog.js
// imports
const BlogPage = ({ data }) => {
  return (
    <Layout pageTitle="My Blog Posts">
      {
        data.allMdx.nodes.map((node) => (
          <article key={node.id}>
            <h2>{node.frontmatter.title}</h2>
            <p>Posted: {node.frontmatter.date}</p>
          </article>
        ))
      }
    </Layout>
  )
}
export const query = graphql`
  query {
    allMdx(sort: {fields: frontmatter___date, order: DESC}) {
      nodes {
        frontmatter {
          title
          date(formatString: "MMMM DD, YYYY")
        }
        id
        body
      }
    }
  }
`
export default BlogPage
The final step in this part of the Tutorial is to render the actual contents of your MDX blog posts. To do that, you’ll need to use a component from gatsby-plugin-mdx called MDXRenderer. Start by importing the component into your Blog page: src/pages/blog.js
import * as React from 'react'
import { graphql } from 'gatsby'
import { MDXRenderer } from 'gatsby-plugin-mdx'
import Layout from '../components/layout'
// ...
– The MDXRenderer component – MDXRenderer is a component included in the gatsby-plugin-mdx plugin that you can use to render the contents of a .mdx file.
The MDXRenderer uses the children prop, similar to the Layout component you created in Part 2. It expects to receive compiled MDX between its opening and closing tags. You can pass in the body field from an MDX node.
Quick Refresher: Need a reminder of how the children prop works? Refer back to the “Create a reusable layout component” section in Part 2.
Here’s a quick example of how to import and use the MDXRenderer component:
import { MDXRenderer } from 'gatsby-plugin-mdx'
// Use this in the JSX for your component
<MDXRenderer>
  { node.body }
</MDXRenderer>
–.–
In the JSX for your Blog page, use the MDXRenderer component to wrap the contents of the body field for each node: src/pages/blog.js
import * as React from 'react'
import { graphql } from 'gatsby'
import { MDXRenderer } from 'gatsby-plugin-mdx'
import Layout from '../components/layout'
const BlogPage = ({ data }) => {
  return (
    <Layout pageTitle="My Blog Posts">
      {
        data.allMdx.nodes.map((node) => (
          <article key={node.id}>
            <h2>{node.frontmatter.title}</h2>
            <p>Posted: {node.frontmatter.date}</p>
            <MDXRenderer>
              {node.body}
            </MDXRenderer>
          </article>
        ))
      }
    </Layout>
  )
}
export const query = graphql`
  query {
    allMdx(sort: {fields: frontmatter___date, order: DESC}) {
      nodes {
        frontmatter {
          title
          date(formatString: "MMMM DD, YYYY")
        }
        id
        body
      }
    }
  }
`
export default BlogPage
Key takeaways
- Data in Gatsby’s GraphQL data layer is stored in nodes.
- Each source plugin creates a different type of node with different fields.
- Transformer plugins create new types of nodes, using data from existing source nodes as a starting point. Transformer plugins don’t actually change the original source nodes. gatsby-plugin-mdx is a transformer plugin that lets you use MDX in your site. With MDX, you can create text content with Markdown formatting and embedded React components.
------------------------------------------------------------------------
Last update on 04 Nov 2021
---