Javascript Unit Testing - Clean Code With Unit Tests
Information drawn from
Unit tests are important. They prevent regressions as you refactor code, serve as documentation, and save you hours of time not spent doing tedious manual testing. In short, tests enable change.
But how much attention to cleanliness do we give our tests? We refactor our app’s production code, give descriptive names to variables, extract methods for repeatable functionality, and make our code easy to reason about. But do we do the same for our tests?
Consider this quote from Robert C. Martin:
“Test code is just as important as production code. It is not a second-class citizen. It requires thought, design, and care. It must be kept as clean as production code.”
So, how do we keep our test code clean? Let’s consider some ideas below.
Structuring Tests
Tests should be structured according to the Arrange-Act-Assert pattern. This pattern goes by many names and is sometimes referred to as the Build-Operate-Check, Setup-Exercise-Verify, or Given-When-Then pattern.I prefer Arrange-Act-Assert for the alluring alliteration. Regardless of what you call it, the pattern looks like this:
- Arrange: Set up the test fixtures, objects, or components you’ll be working with.
- Act: Perform some operation, perhaps by calling a function or clicking a button.
- Assert: Assert that the expected behavior or output occurred.
In the React world, applying this pattern when testing a simple toggle button component might look like this:
 Arrange-Act-Assert pattern when unit testing a toggle button component’s rendered content
We arrange our code and act on it all in the same line by rendering the ToggleButton component. We then make assertions on the output that it renders a button to the DOM and that the button’s text is visible on the screen. A more complex example might look like this:

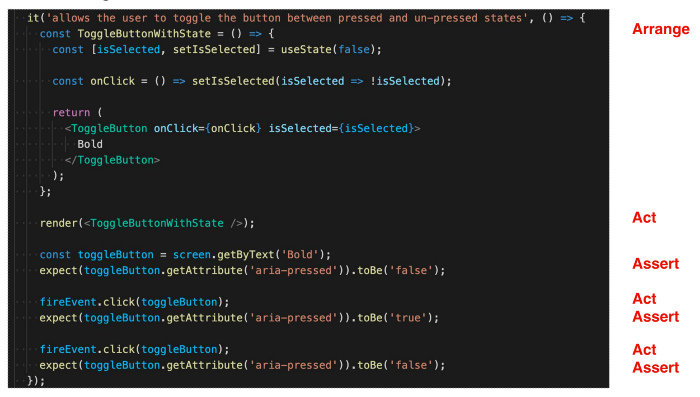
Arrange-Act-Assert pattern when unit testing a toggle button component’s interactive behavior
Here, we arrange our code by creating a stateful component that allows the toggle button to be toggled on and off. We act by rendering the component. We then assert that the button is initially toggled off. Next, we act again by clicking the button and then make another assertion that the button is now toggled on. Just for good measure, we act again by clicking again, and we assert again by verifying the button is back to being toggled off.
It’s important to note here that you should generally only be writing code for the Arrange phase at the beginning of each test. After that, it’s OK to cycle between iterations of Act and Assert. But if you find yourself back in the Arrange phase later on in the test, that’s probably a good sign that you’re testing a second concept and should move that to a separate test. More on this later.
Test Object Builders
Test object builders are methods, classes, or constructor functions that allow you to created commonly needed objects. For example, you might often be working with a User object that contains all sorts of data about any given user. This could include a first name, last name, email address, phone number, mailing address, job title, app permissions, and much more. Creating a new User object in each of your tests could easily take several lines of code, leading to an unwieldy test file hundreds of lines long.
Instead, we can keep our test code DRY by creating a helper test object builder method that returns a new User object for us. Even better, we can allow the default values to be overridden for when we need to be more specific about the properties used in the object.
One library I find especially helpful is the faker.js npm package. We can use this package to generate mock data for all sorts of different fields like firstName, jobTitle, phoneNumber, and more.
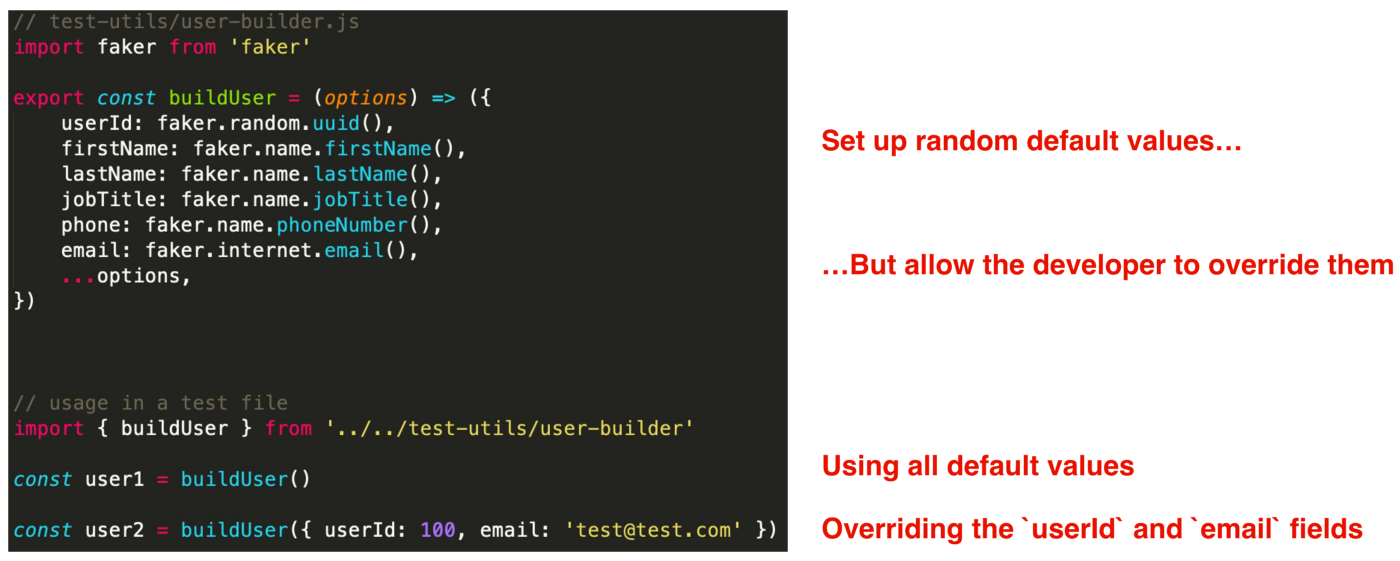
Consider this example for a User test object builder:

Our buildUser method returns a plain object representing a user. We can then use this buildUser method in our test files to create users that have random values by default (the user1 user) or users that have specific values we specify (the user2 user).
Evaluate a Single Concept per Test
Each test should verify only one thing. Don’t try to test several things all in the same test. For example, a bad test for a date picker component might read something like “renders in various states” and then render eight different date pickers to illustrate the differences. A test like this is doing too much.
A better test would be more specific — something like “renders the date picker when the user clicks the text input.”
Tests Should Be Fast
Slow test suites are a pain to run. Even worse, when slow test suites are optional or not enforced as part of a CI pipeline, developers tend to choose to not run these test suites. No one likes to wait.
Fast test suites, on the other hand, can be run continuously while you’re writing production code. This short feedback loop enables you to develop more quickly and more confidently. Fast test suites also facilitate programming paradigms like test-driven development.
In the JavaScript world, running Jest tests in watch mode while you develop is a game-changer.
## Tests Should Be Independent
Tests should be able to be run in any order. In other words, any given test should not depend on the test before it. If you’re not careful in doing a proper teardown or cleanup between tests in your test files, you may end up modifying global variables in one test that then affect subsequent tests. This can lead to unexpected behavior and headaches. It’s always a fun debugging adventure when a single test passes when run in isolation but fails when run as part of the test suite.
If you’re using Jest, the setup and teardown is typically done in beforeEach and afterEach code blocks. It’s also helpful to remember that each test file gets its own instance of JSDOM, but tests within the same file share that same JSDOM instance.
Tests Should Be Repeatable
Tests should be able to be run in any environment. If the test suite passes on my machine, it should pass on your machine too. That also means it should pass in the CI pipeline. When tests are repeatable, there are no surprises where a test passes in one environment but fails in another. Flakiness like that decreases your confidence in your tests.
## Tests Should Be Self-Validating
Tests should return a Boolean. Either the test passes or it fails. You shouldn’t need a human to interpret the results of the test. This is one of many reasons why snapshot tests suck and should be avoided.
Snapshot tests don’t tell you what the correct output should be. They just tell you that something is different. It’s up to you as the developer to decide if it’s intentional that the snapshot changed or if this is an error that needs to be addressed. Oftentimes, though, what ends up happening is that developers blindly accept the changes to the snapshot and assume that the new snapshot is correct.
## Tests Should Be Written in a Timely Manner
Tests should be written at the same time as the production code. If you’re an advocate for test-driven development, then you believe tests should be written right before the production code. If you’re not as strict, then you probably write your tests shortly after the production code. Either of those approaches is much better than writing tests months later when trying to play catch-up to increase your repository’s code coverage.
Make Sure Tests Fail When They Should
Have you ever come across a test that doesn’t test what it says it does? The test may be passing, but it definitely doesn’t test anything meaningful or what it claims to. Tests like these create a false sense of confidence. Your test suite is passing, after all!
Consider this quote from Martin Fowler:
“I like to see a test fail at least once when I write it.”
Those are wise words! It’s easy to verify that your test is doing its job by making a slight modification to either the test code or the production code to change the output to something intentionally incorrect. If your test fails, great!
Don’t forget to change your test back to get it passing again after doing this sanity check, of course.
Remember To Test Your Edge Cases
It’s a rookie mistake to only test the happy path. In addition to making sure the normal behavior works, try to consider ways in which things could go wrong. What if someone provided invalid arguments to your function? Or perhaps unexpected data types?
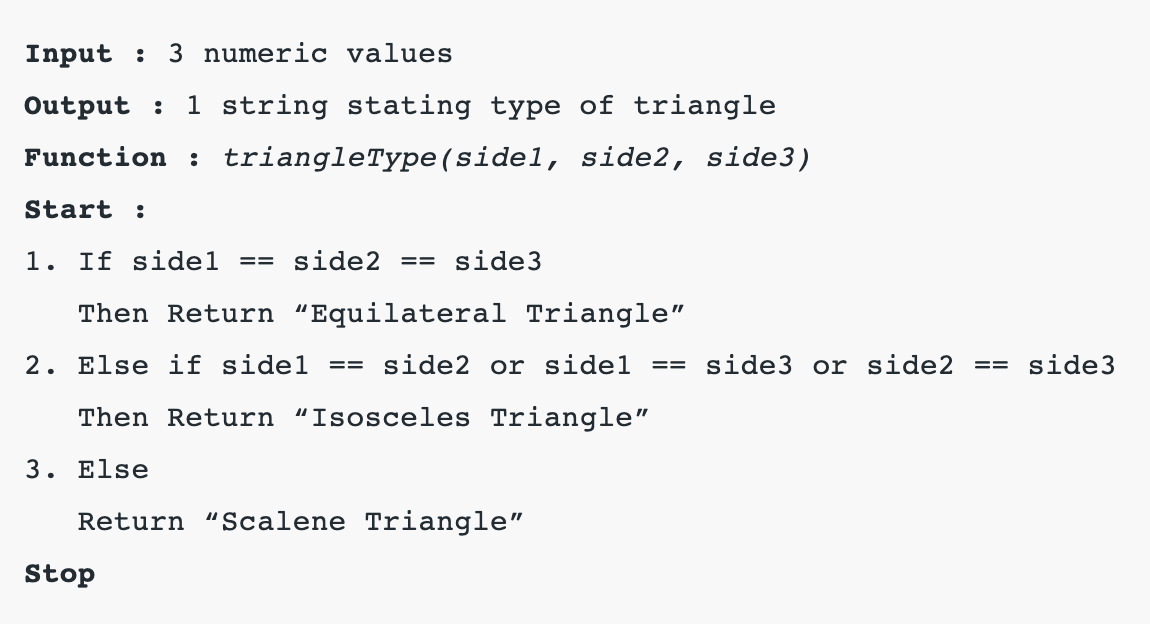
Consider this example scenario: You’re writing a function that returns the type of a triangle based on the value of the length of the three sides of that triangle. We’ll call the function triangleType, and it’ll have three parameters so that the function signature looks like this: triangleType(side1, side2, side3).
What cases would you test for a function like this?

The immediately obvious test cases might be to check that it can correctly identify a valid equilateral triangle, isosceles triangle, and scalene triangle. Your test cases might look like this:
triangleType(4, 4, 4) // Equilateral Triangle
triangleType(6, 7, 6) // Isosceles Triangle
triangleType(6, 7, 8) // Scalene Triangle
Interestingly enough, testing those three cases would give you 100% code coverage based on the current implementation of the function. But these three tests alone are not enough.
What if, for example, all zeros were provided to the function? That’s not a triangle. That’s a point. But the function would identify that as an equilateral triangle since all sides are equal.
What if negative numbers were provided to the function? A triangle can’t have negative lengths. That doesn’t make any sense.
Or what if two of the sides were much shorter than the third side? Then the sides wouldn’t connect, and we wouldn’t have a triangle.
Those three additional test cases might look like this:
triangleType(0, 0, 0) // Not a triangle
triangleType(-6, -7, -8) // Not a triangle
triangleType(5, 3, 100) // Not a triangle
As you can see, it’s essential to test more than just the happy path in your code.
Test the Things You’re Most Worried About Going Wrong
I like to shoot for 100% test coverage, but it’s important to not be dogmatic about this number. There is a law of diminishing returns, and each additional test adds less and less value. If you have 95% code coverage, it might not be worth it to get that last 5% of code coverage. Not everything is worth testing.
The important thing is to test the critical parts of the application. What are the areas of your code where you’re most concerned about things going wrong? Focus on having good tests in place for that core functionality first. Then write additional tests to cover less critical paths. But as you do so, remember to focus your tests on specific behavior and product requirements — not just on getting that last hard-to-reach line covered.
Summary
You made it! If you need a quick refresher on everything we’ve covered in this article, here are my unit testing tips and tricks for clean code:
- Structure your tests using the Arrange-Act-Assert pattern.
- Use test object builders to make test setup easy for commonly used objects.
- Evaluate a single concept per test.
- F.I.R.S.T. — Tests should be fast, independent, repeatable, self-validating, and timely.
- Make sure tests fail when they should.
- Remember your boundaries and edge cases.
- Test the things you’re most worried about going wrong.
- Thanks for reading, and happy coding!
------------------------------------------------------------------------
Last update on 29 Nov 2021
---